Picture this. You’re running late, you open the top vanity drawer to grab a hair tie, and out tumbles a half-used lip balm, three mismatched tweezers, and a mascara that’s older than your phone.
Sound familiar? You’re definitely not alone.
Bathroom drawer organization is tricky because these drawers hold lots of tiny items in lots of odd shapes, and we usually open them while we’re rushing. Add humidity, leaky bottles, and expired products, and the clutter builds up fast.
The good news? You don’t need a big budget, a renovation, or a free weekend. You just need a simple system.
In this guide, you’ll learn how to organize bathroom drawers step by step, using affordable drawer dividers, trays, and bins. You’ll also get a drawer-by-drawer layout for your bathroom vanity, fixes for deep, shallow, and U-shaped drawers, a product shelf-life guide, and a bathroom declutter checklist you can use right away.
Whether you have a double vanity, a small bathroom with one skinny drawer, or no drawers at all, you can follow along.
Table of Contents
Quick Answer: How to Organize Bathroom Drawers in 7 Easy Steps
To organize bathroom drawers, empty each drawer, declutter expired and unused products, sort what’s left by category, measure the space, choose drawer dividers and trays that fit, arrange items by how often you use them, and do a quick reset once a week.
The 7 steps at a glance:
- Empty and clean the drawer
- Declutter expired, broken, and duplicate products
- Sort items by category and how often you use them
- Measure the drawer before you buy anything
- Choose the right dividers, trays, and bins
- Arrange everything by zone
- Label and test your new layout
That’s the whole system. Now let’s walk through each step with real examples, a drawer-by-drawer layout, and fixes for the trickiest drawers.
What to Store in Bathroom Drawers vs. Cabinets (Bathroom Storage Basics)
Before you move a single bottle, it helps to know what actually belongs in a drawer.
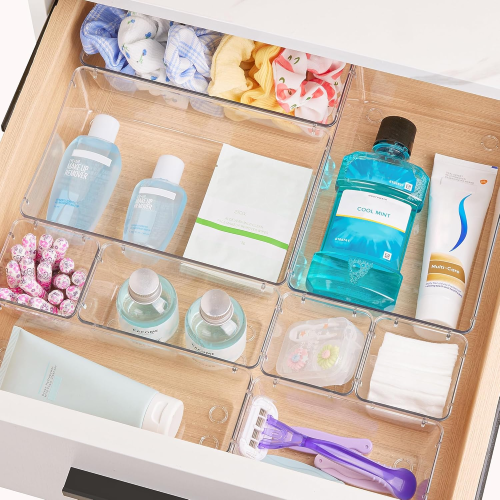
Bathroom drawers work best for small, everyday items you grab daily, like skincare, makeup, and grooming tools. Cabinets and under-sink storage work best for bulky or backup items you don’t need every morning.
Best for bathroom drawers:
- Daily skincare (cleanser, moisturizer, serums)
- Makeup and makeup brushes
- Hair ties, clips, and bobby pins
- Toothbrushes, floss, and toothpaste
- Grooming tools like tweezers, nail clippers, and razors
Best for cabinets or under the sink:
- Spare towels and washcloths
- Cleaning supplies
- Bulk toiletries and backup products
- Bulky hair tools and hair dryers
Real-life example: If you use your hair dryer every morning, a deep drawer near the sink is perfect. A hair mask you use once a month can live in the cabinet.
One thing that doesn’t belong in a bathroom drawer: medications. Heat and humidity are hard on them, so check the safety section later in this guide.
How to Organize Bathroom Drawers in 7 Easy Steps
Ready? Grab a towel, a trash bag, and a damp cloth. Start with one drawer. Once you see how well the system works, the rest will go much faster.
Step 1: Empty and Clean Your Bathroom Drawers (Add Moisture-Resistant Liners)
Start by taking everything out of one drawer and laying it on a towel or the counter.
It may look messy for a moment, but this is the secret. When you see everything at once, you finally know what you own, and you spot duplicates fast.
Next, wipe the drawer with a damp cloth and a mild cleaner, then let it dry completely.
Pro tip: Bathrooms are humid, so add a moisture-resistant drawer liner that you can wipe clean. It protects your vanity and keeps small items from sliding around.
Step 2: Declutter Your Bathroom Products (Keep, Donate, Toss)
This is where the magic happens. Pick up each item and ask yourself three simple questions:
- Have I used this in the last 6 months?
- Is it expired, broken, or dried out?
- Do I already have a duplicate?
If the answer to the first question is “no,” or the answer to either of the last two is “yes,” it’s time to let it go.
Sort everything into three piles: keep, donate (unopened, unused items), and toss.
Example: Three half-used body lotions? Pick your favorite, use it up first, and move the others to a backup spot.
Bathroom Product Shelf-Life Guide: When to Toss Makeup and Skincare
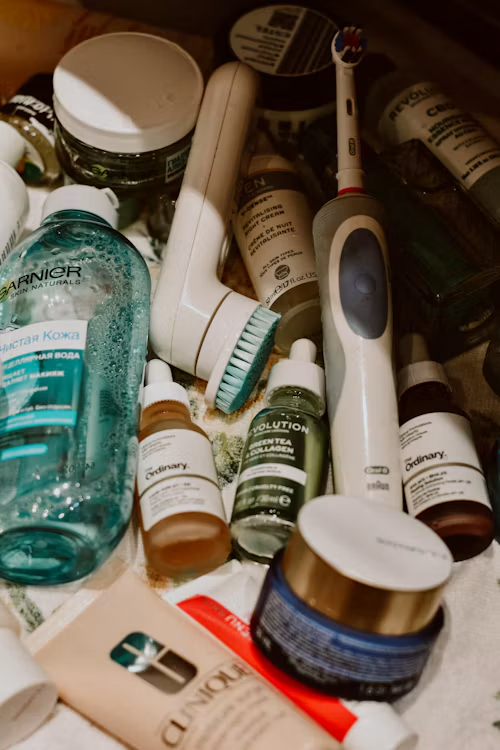
Wondering what counts as “expired”? Here’s the honest answer. The U.S. Food and Drug Administration (FDA) says no U.S. laws require most cosmetics to carry a specific shelf life or expiration date. So how long a product lasts depends on the product, how you use it, and how you store it.
Here is what to watch for:
- Mascara: Manufacturers usually recommend discarding it two to four months after purchase. If it dries out, throw it away, and never add water or saliva to revive it.
- Other eye-area makeup: Eye products tend to have shorter shelf lives than other cosmetics, so replace them sooner than face products.
- Sunscreen and acne treatments: These are regulated as drugs, so they must have an expiration date printed on the label. Follow it.
- Everything else: Look for the open-jar symbol (PAO, or period after opening) if the brand prints one, and toss anything that changes in smell, color, or texture.
Why bathrooms are tricky: The FDA notes that moisture, such as in a bathroom, can make it easier for bacteria and fungi to grow, and that heat can break down preservatives. Keep products clean, tightly closed, and away from heat.
Quick tip: Write the open date on new products with a permanent marker, so you never have to guess.
Step 3: Sort Toiletries by Category and How Often You Use Them
Now group what’s left. Start with broad categories:
- Skincare
- Makeup
- Hair care and accessories
- Dental care
- Shaving and grooming
- First aid and daily essentials
Then sort each group by frequency of use: daily, occasional, and rarely used.
Example: In your makeup pile, your everyday mascara and lip balm are “daily.” The glittery eyeshadow you wear twice a year is “rarely used.”
This simple split decides where each item will live in your drawers.
Step 4: Measure Your Drawers Before Buying Drawer Dividers
Here’s the mistake almost everyone makes: buying drawer organizers first and measuring later.
Grab a tape measure and write down three numbers for the inside of each drawer:
- Width (left to right)
- Depth (front to back)
- Height (from the drawer floor to the top edge)
Also measure your tallest and longest items, like a flat iron, a bottle of face wash, or a razor, so you know they’ll actually fit.
Quick sizing guide:
- Shallow drawers (under about 3 inches tall): low trays and slim dividers
- Medium drawers: adjustable dividers plus small bins
- Deep drawers: stackable bins or extendable dividers
Step 5: Choose the Best Bathroom Drawer Organizers (Dividers, Trays, and Bins)
Now the fun part. There are many bathroom drawer organizers out there, so here’s a simple way to choose.
- Adjustable or expandable dividers: best for custom layouts and drawers of different sizes
- Trays: best for small items like hair clips, cotton swabs, and makeup
- Bins: best for bulkier items like hair tools or backup products
- Stackable organizers: best for deep drawers
- Drawer liners: protect the drawer and keep items from sliding
Drawer Organizer Materials Compared: Acrylic vs. Plastic vs. Bamboo vs. Silicone
| Material | Best For | Pros | Watch Out For |
|---|---|---|---|
| Clear acrylic | Makeup, skincare, small items | See-through and easy to wipe clean | Can crack if dropped and may slide without a liner |
| Plastic | Everyday bins and tall bottles | Lightweight and water-resistant | Quality varies, so check that edges are sturdy |
| Bamboo or wood | Hair accessories and grooming tools | Sturdy, stylish, and often adjustable | Can absorb moisture, so wipe up spills quickly |
| Silicone | Items that leak or roll, like nail polish | Flexible, non-slip, and easy to rinse | Soft sides don’t hold their shape under heavy items |
Swipe left or right to view all columns →
Tip: Mix and match sizes. A larger bin for hair tools and small trays for makeup usually works better than one big organizer.
Step 6: Arrange Your Bathroom Vanity Drawers by Zone (Drawer-by-Drawer Layout)
This is where your drawers start to feel truly organized. The idea is simple: put the things you use most where you can reach them fastest.
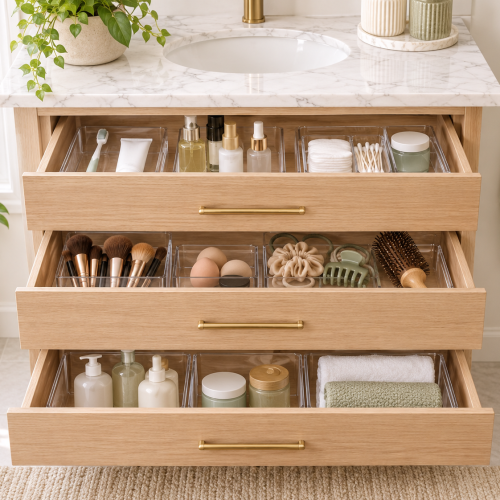
Here’s an easy drawer-by-drawer layout for a standard three-drawer bathroom vanity:
Top drawer: daily essentials
- Toothbrush, toothpaste, floss
- Daily skincare and lip balm
- Hair ties and the makeup you use every day
Middle drawer: styling and grooming
- Hair tools and accessories
- Extra makeup and brushes
- Razors, tweezers, and nail tools
Bottom drawer: backups and rarely used items
- Spare toiletries and travel-size products
- Seasonal items like sunburn relief
- Extra toothpaste or soap
Only have two drawers? Combine the top two zones into your top drawer, and use the bottom for backups.
Sharing a vanity? Give each person their own drawer, or use removable bins so everyone has a clear space.
Smart trick: Store items upright whenever you can. You’ll see everything at a glance, and nothing gets buried at the back.
Step 7: Label Your Drawer Organizers and Test the Layout
Put everything back, then give the drawer a quick test. Open it, close it, and reach for a few items.
If something is hard to grab, adjust it. A good system should feel easy on a busy morning.
Optional: Add small labels to dividers or bins, especially in a shared bathroom. They help everyone put things back in the right spot.
Where to Store Awkward Bathroom Items (Hair Tools, Razors, Nail Polish, and More)
Some items simply don’t fit neatly into a tray. Here’s where they usually work best.
| Item | Where to Store It | Quick Tip |
|---|---|---|
| Electric toothbrush and razor | A long, narrow bin or adjustable-width compartment | Let them dry before storing |
| Hair tools (flat iron, curling wand) | A slim bucket or divided bin | Let them cool completely and coil the cord loosely |
| Nail polish | Upright in a small tray | Keep it away from heat |
| Perfume | A drawer away from heat and sunlight | Light and heat can change scent and color |
| Contact lens supplies | A small, lidded container | Keeps them clean and easy to find |
| Makeup brushes | Upright in a cup, or flat in a shallow tray | Clean them regularly |
| First aid basics | One small, labeled bin | Easy to grab fast |
| Medications | Not in the bathroom | See the safety section below |
Swipe left or right to view all columns →
Example: If your flat iron’s cord keeps tangling, wrap it loosely, then place the tool in a narrow bin that holds it upright.
How to Organize Different Types of Bathroom Drawers
Not all drawers are the same. Here’s how to handle the trickiest ones in your bathroom vanity.
How to Organize Deep Bathroom Drawers
Deep drawers are great for storage, but things easily get lost at the back.
- Use extendable dividers to keep items standing upright
- Add stackable bins to use the full height
- Put daily items in front and backups behind them
Quick example: Place a stackable tray on top for makeup and hair accessories, and keep bulkier hair products in the section below.
How to Organize Small and Shallow Bathroom Drawers
With little space, every inch counts. This is the heart of small bathroom organization.
- Choose slim, low-profile trays
- Keep only the essentials in the drawer
- Move backups to a cabinet or a shelf
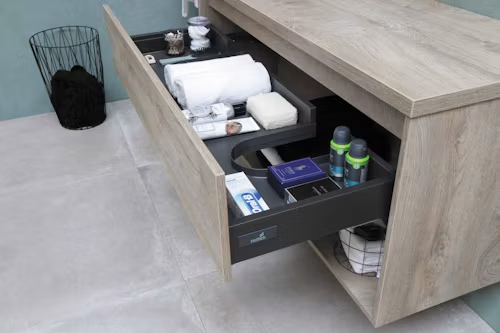
How to Organize U-Shaped Bathroom Vanity Drawers (Plumbing Cutout)
Many sink vanities have a drawer with a curved cutout for the pipes. These can feel awkward, but they’re totally workable.
- Use narrow organizers along the two side sections
- Store small items like cotton swabs and floss on the sides
- Keep the front of the drawer for the things you grab most
How to Organize Makeup in Bathroom Drawers (Makeup Drawer Organizer Ideas)
A good makeup drawer organizer stops products from rolling around and makes everything easy to see.
- Store vertically if you want to fit more products and see them all
- Store flat in trays if you prefer to see everything at once
- Group by type: face, eyes, lips, and tools
- Keep brushes and applicators clean, since the FDA lists clean containers and applicators as a basic way to keep cosmetics safe
How to Organize Shared and Kids’ Bathroom Drawers
- Give each person a removable bin
- Use labels or color-coded bins
- Keep kids’ items in a lower, easy-to-reach spot, and keep anything sharp or unsafe out of reach
Renter-Friendly Bathroom Drawer Organization (No Drilling Needed)
Renting? You can still get a tidy drawer.
- Use freestanding organizers and peel-and-stick dividers
- Add a removable liner
- Skip anything that requires drilling or permanent glue
Bathroom Drawer Safety and Hygiene: Moisture, Medications, and Sharp Items
Bathrooms are warm, damp spaces, so a few simple habits go a long way.
- Fight moisture: The FDA notes that moisture, such as in a bathroom, can make it easier for bacteria and fungi to grow. Choose wipeable, water-resistant organizers and let items dry before storing them.
- Contain leaks: Put bottles in a small bin so spills don’t spread across the drawer.
- Keep medications out of the bathroom: UCLA Health points out that the heat and humidity from showers and baths make the bathroom one of the worst places to store medicine. Choose a cool, dry spot, keep it out of children’s reach, and follow the label.
- Keep sharp items safe: Store razors and blades out of children’s reach.
- Separate hot tools: Let hair tools cool completely before putting them away.
Good habit: Wipe down the inside of your drawer once a month. It takes about two minutes.
No Bathroom Drawers? Small Bathroom Storage Alternatives
Don’t have drawers at all? You still have plenty of bathroom storage ideas to choose from.
- Under-sink bins and pull-out drawers: perfect for backups and cleaning supplies
- Freestanding drawer units: add instant drawer space
- Baskets on shelves: easy to pull out and carry
- Wall-mounted or over-the-door storage: great for small bathrooms
Tip: Treat a basket like a “drawer” and give it one job, such as “hair accessories” or “first aid.”
Budget-Friendly Bathroom Drawer Organization Ideas (DIY and Low-Cost)
You don’t need to spend much, or anything at all. These DIY drawer organizer ideas work with things you probably already own.
- Use small boxes, jars, and cups
- Repurpose shoebox lids as trays
- Try ice cube trays for tiny items like earrings and bobby pins
- Start with one or two inexpensive dividers, then add more if you need them
Remember: Organize first, buy later. You may find you need fewer organizers than you thought.
How to Keep Bathroom Drawers Organized Long Term (Weekly and Monthly Routine)
An organized drawer is great. A drawer that stays organized is even better.
- Weekly: do a quick 2-minute reset and put stray items back
- Monthly: check for expired products and wipe the drawer
- Always: follow a simple “one in, one out” rule
Before buying something new, ask yourself: “Do I already have something like this?”
5 Common Bathroom Drawer Organization Mistakes to Avoid
- Buying organizers before decluttering or measuring
- Overfilling drawers until they don’t close smoothly
- Mixing categories in one section
- Keeping expired or unused products “just in case”
- Storing daily items in the bottom drawer
Bathroom Drawer Organization FAQs
How do you organize bathroom drawers?
Start by emptying and cleaning the drawers, then declutter expired and unused items. Sort what’s left by category, measure the drawers, and choose organizers that fit. Finally, arrange items by how often you use them, with daily essentials in the top drawer.
What should you keep in bathroom drawers?
Store small, everyday items in drawers: skincare, makeup, hair accessories, toothbrushes, and grooming tools. Keep bulky items like spare towels, cleaning supplies, and extra products in cabinets or under the sink. Medications are better stored somewhere cool and dry, outside the bathroom.
How do you organize deep bathroom drawers?
Use extendable dividers and stackable bins to make use of the full depth and height. Keep daily items at the front and store products upright so you can see them at a glance and nothing gets lost at the back.
How do you organize small bathroom drawers?
Use slim, low-profile trays and keep only your essentials in the drawer. Move backups and rarely used items to a cabinet or shelf so the drawer stays easy to open and use.
How can you organize a bathroom with no drawers?
Use under-sink bins, pull-out drawers, freestanding drawer units, or baskets on a shelf. Give each basket one clear purpose, like “hair accessories” or “first aid,” so it works just like a drawer.
Final Thoughts on Organizing Bathroom Drawers
Organizing your bathroom drawers doesn’t have to be a huge project. Start with just one drawer, follow the steps above, and enjoy the difference.
Once you see how calm your mornings feel, you’ll probably want to tackle the next one.
To recap: declutter, sort, measure, choose the right organizers, arrange by zone, and keep it up with a quick weekly reset.