You have seen the dream photo. Two machines side by side, a long countertop running over the top, and a basket of fluffy towels sitting on it like a magazine cover.
It looks lovely. It is also almost always built for front loading machines.
If you own a top loading washer, the lid swings upward. Anything sitting right above the machine will get in its way. You cannot stack a dryer on it, and you cannot just slide a counter over it.
Here is the good news: a top loader is not a design dead end. It just means your storage and folding space live in different spots. Think beside the machine, above the open lid line, and in the gaps most of us ignore.
In this guide, you will find 15 practical ideas, a simple way to measure your own lid, 3 beginner DIY builds, and tips for ventilation, budget and renting.
Table of Contents
Quick Answer: What Works Best in a Small Laundry Room with a Top Loader?
- Put storage beside the washer or above the open-lid line, never directly over the lid.
- Add a fold-down shelf, side counter or rolling cart for folding clothes.
- Measure your open lid first. It takes five minutes and prevents the most common mistake.
What You Will Learn in This Guide
- How to measure lid clearance before you buy or drill anything
- What will not work with a top loader (so you do not waste money)
- 15 small laundry room ideas with budget, difficulty and renter-friendly tags
- 3 simple DIY projects a beginner can handle
- A ventilation and safety checklist
- Straight answers to the most searched questions
How Much Space Does a Top Load Washer Lid Need? Measure Before You Build
This is the step most people skip, and it causes the classic mistake: a shelf hung an inch too low.
The result? You end up holding the lid open with one hand while juggling detergent and wet towels with the other. Not fun.
Why you will see different clearance numbers online
Search this question and you will find a pile of different answers. Guides range from roughly 18 to 24 inches at the low end to 27 to 36 inches at the high end, and some manufacturers recommend at least 2 feet.
That is not because someone is wrong. Every washer lid is a different size and swings a little differently.
The takeaway: do not trust a single rule of thumb. Trust your own tape measure and your washer’s manual.
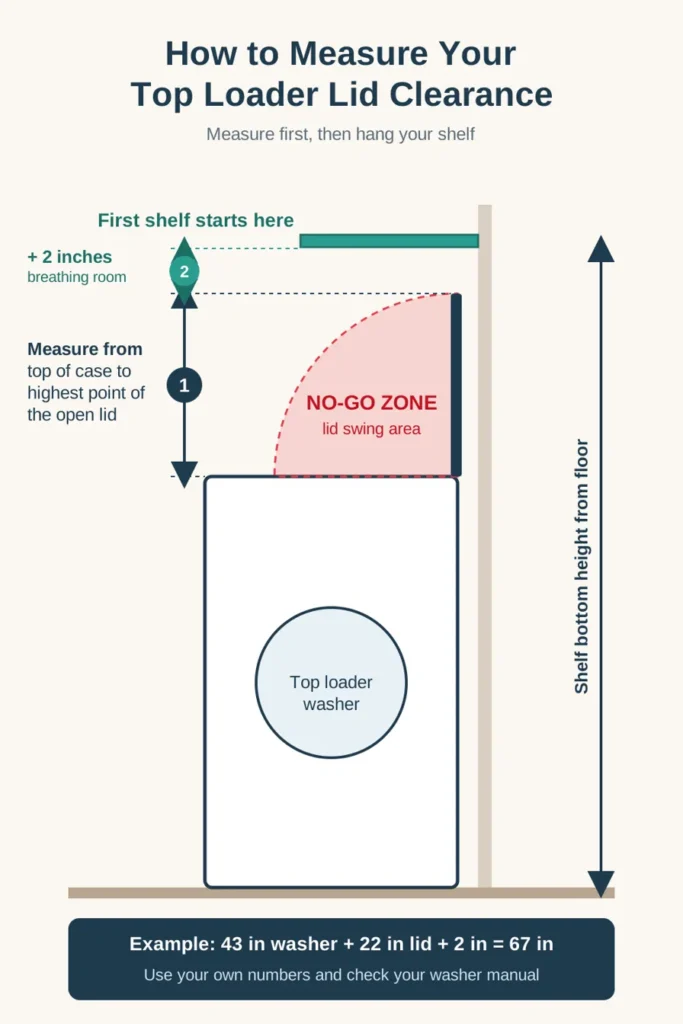
How to measure your lid clearance in 4 steps
- Open the lid all the way. Lift it until it stops, the way you would to load a big comforter.
- Measure straight up. Run your tape from the top of the washer case to the highest point of the open lid.
- Add breathing room. About 2 inches gives your hands and a full laundry basket space to move.
- Write the number down. This is the lowest point anything above your washer can start.
Quick example (use your own numbers): Say your washer stands 43 inches tall and the open lid rises 22 inches above the case. Add 2 inches of breathing room. The bottom of your first shelf should sit at about 67 inches from the floor or higher.
The cardboard test (cheap and surprisingly reliable)
Cut a piece of cardboard the same size as your washer lid. Tape it along the back edge of the washer top and swing it up to the open position.
Hold it there and check the wall above. Is anything in the way? Is there room for your arm and a full basket?
It takes about ten minutes and costs nothing. It is much easier than re-drilling holes.
Can You Put a Counter Over a Top Loading Washer?
This is the number one question people ask, and the internet gives confusing answers. Some sites say yes and others say no. Both can be right, depending on the type of counter.
Think of it like a garage door. A solid wall over the opening will not work, but a door that lifts out of the way will.
| Counter option | Works with a top loader? | What to know |
|---|---|---|
| Fixed counter directly over the washer | Usually no | Blocks the lid and the controls |
| Wall-supported counter set high above the lid | Sometimes | Must clear the fully open lid |
| Fold-down (hinged) counter | Yes | Folds out of the way so the lid can open |
| Pivoting shelf | Yes, with care | The hardware must be sturdy or it can shift over time |
| Side counter or rolling cart | Yes | The easiest and most reliable option |
| Removable washer-dryer topper | Yes | You must lift it off before every load |
Swipe left or right to view all columns →
My simple tip: if you want the easiest solution, go with a side counter or cart. It works with every top loader and needs no special hardware.
What Will Not Work With a Top Loader (So You Do Not Waste Money)
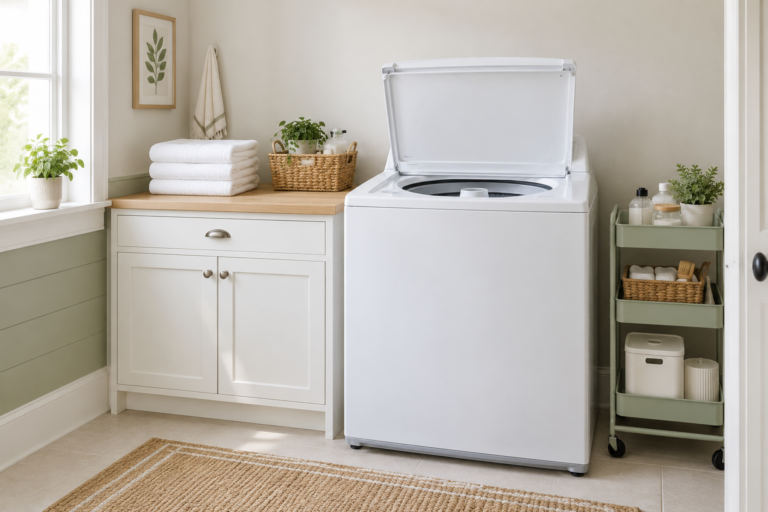
Three popular ideas look great online but usually do not suit a top loader.
1. A fixed countertop over the machines
This is the photo everyone pins. It works over front loaders because their doors open on the front. A top loader needs open space above the lid.
2. Stacking a dryer on top
The dryer would sit right where your lid needs to open. Stacking is generally designed for front loading washers. The exception is a factory-made laundry tower with a top-load washer built in, but you cannot turn a regular pair into one. Check with the manufacturer before trying any stacking kit.
3. Cabinets that start below the open-lid line
A cabinet bolted too low is the same mistake as the too-low shelf, only more expensive.
15 Small Laundry Room Ideas for a Top Loading Washer
Every idea below keeps the lid clear. Each has a quick tag so you can find what fits your budget and skills.
How to read the tags: Budget means mostly DIY or ready-made pieces. Mid means ready-made cabinets or kits. Custom means a built-in made for your room. Prices vary by store and country, so check local prices before you plan.
Folding and Work Surface Ideas
1. Add a side counter next to the machines
Cost: Mid to Custom | Difficulty: Moderate | Renter-friendly: Only if freestanding | Lid-safe: Yes
A counter beside the washer gives you a real folding surface without touching the lid. Choose a counter-height cabinet with storage underneath.
Picture folding warm towels on a flat surface instead of balancing them on top of the dryer, then sliding detergent and baskets into the cabinet below.
2. Mount a fold-down shelf or folding table on the wall
Cost: Budget | Difficulty: Easy to moderate | Renter-friendly: Often, if your lease allows screws | Lid-safe: Yes, on a side wall
In a room too tight for a side counter, a wall-mounted folding table appears when you need it and disappears when you do not. Fold it down on laundry day and up for the rest of the week.
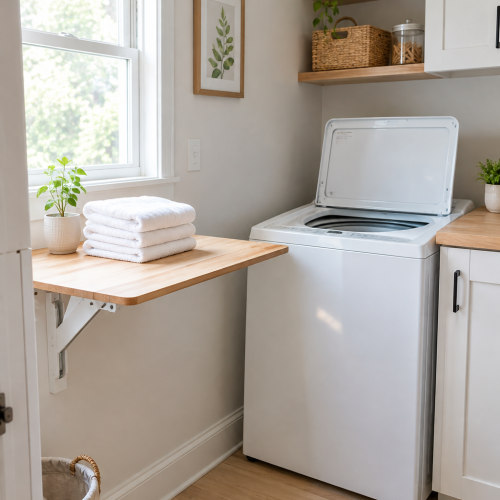
3. Try a hinged or pivoting shelf over the lid
Cost: Mid | Difficulty: Moderate to pro | Renter-friendly: Rarely | Lid-safe: Yes, when fully raised
This is for people who really want a continuous work surface. The shelf flips up when you load the washer, then flips down as a folding top.
The pivot hardware must be sturdy, or it can loosen over time. Treat this as a project for someone comfortable with hardware, and test it with a full basket.
Storage Ideas
4. Put shelves or cabinets above the lid line
Cost: Budget to Mid | Difficulty: Easy to moderate | Renter-friendly: Often | Lid-safe: Yes, if you measured
The wall above your washer is prime storage space, as long as the bottom shelf starts above your open-lid height plus a couple of inches. Shelves about 12 inches deep suit detergent and baskets, and 14 to 16 inches deep works higher up for bulk items.
Solid shelves are better than wire ones, which can leave marks on folded stacks and let small items slip through.
5. Add a tall storage tower beside the machines
Cost: Mid to Custom | Difficulty: Moderate | Renter-friendly: If freestanding and anchored | Lid-safe: Yes
A slim tower on the side holds the things that always end up leaning against a wall, like the ironing board, drying rack and broom. A tower around 12 to 18 inches wide fits many small rooms. Because it sits beside the washer, it never competes with the lid.
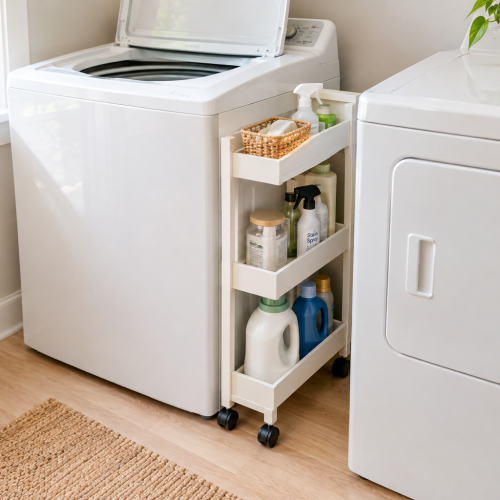
6. Use the gap between the washer and dryer
Cost: Budget | Difficulty: Easy | Renter-friendly: Yes | Lid-safe: Yes
That skinny gap is a sock graveyard. Fill it with a slim rolling cart or pull-out, often made for gaps of about 6 to 10 inches. It stores detergent and stain spray, and you can roll it out to reach behind the machines.
7. Hang a pegboard on the back wall
Cost: Budget | Difficulty: Easy | Renter-friendly: Partly | Lid-safe: Yes, if kept flat to the wall
A pegboard holds stain spray, brushes and lint rollers at eye level. Add a small shelf along the bottom for supplies and rearrange the hooks whenever you like.
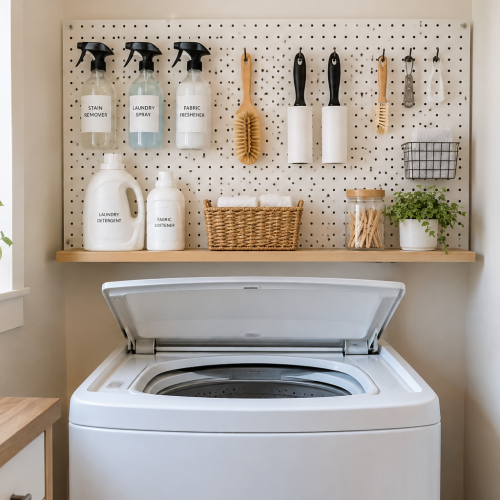
8. Choose closed lockers, cabinets or labeled baskets
Cost: Mid to Custom | Difficulty: Moderate to pro | Renter-friendly: Rarely (baskets are fine) | Lid-safe: Yes, when placed beside the machine
A small room feels bigger when the clutter is out of sight. If your laundry room shares space with a mudroom, closed lockers give shoes and winter gear a home too. On open shelves, labeled baskets keep dryer sheets, stain sprays and clothespins tidy.
Drying and Hiding Ideas
9. Add a hanging rod for air-drying
Cost: Budget | Difficulty: Easy | Renter-friendly: Often (tension rods work) | Lid-safe: Yes, above the lid line or on the side
You cannot drape clothes over a top loader. A hanging rod fixes that, and it is great for delicates and shirts on hangers. Over a side counter, even a short rod lets drips fall on the floor instead of your folded towels.
10. Use a foldable or wall-mounted drying rack
Cost: Budget | Difficulty: Easy | Renter-friendly: Yes | Lid-safe: Yes
A collapsible rack folds flat against a wall or behind a door when you do not need it. It is perfect for sweaters and gym clothes.
11. Cover the connection box with a shelf
Cost: Budget | Difficulty: Moderate | Renter-friendly: Sometimes | Lid-safe: Only if shallow and high enough, so test with the cardboard lid
The water and outlet box behind the machines is an eyesore. A small shelf above it can hide it and give you a spot for supplies or a plant.
Comfort, Layout and Style Ideas
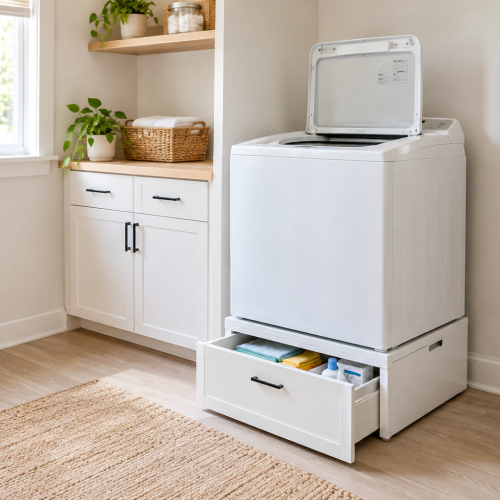
12. Raise the washer on a pedestal or platform
Cost: Mid | Difficulty: Easy to moderate | Renter-friendly: Yes, if freestanding | Lid-safe: Only after re-measuring
A pedestal lifts the machine so you bend less, and many have a drawer underneath. Check what your washer’s maker recommends, since pedestals can add cost and sometimes vibration.
Here is the catch most people miss: raising the washer raises the open lid too. Re-measure before adding shelves above.
13. Build a laundry closet with sliding or pocket doors
Cost: Mid to Custom | Difficulty: Moderate to pro | Renter-friendly: Rarely | Lid-safe: Yes
A closet with doors hides everything when guests visit. Sliding, bifold or pocket doors do not swing into your working space the way standard doors can.
One safety note: a closed closet door needs vent openings at the top and bottom for airflow. See the checklist below.
14. Brighten the room with a backsplash, paint and good lighting
Cost: Budget | Difficulty: Easy | Renter-friendly: Yes, with peel-and-stick options | Lid-safe: Yes, if nothing hangs below the lid line
A small room feels bigger with light and a fresh color. Easy upgrades include:
- Peel-and-stick wallpaper or tile: goes up in hours and comes off later, so it is a favorite for renters
- A tile backsplash behind the machines: a lot of style for a modest spend, and easy to wipe clean
- Bright paint or beadboard: a cheerful color makes a tiny room feel welcoming
- Matching baskets and jars: pick the same style, label them, and add a plant for a styled look
15. Choose moisture-resistant flooring
Cost: Mid to Custom | Difficulty: Moderate | Renter-friendly: Sometimes (removable vinyl planks)
Laundry rooms see spills, humidity and the occasional leak. Pick vinyl, tile or another water-resistant floor, and skip carpet completely.
3 Easy DIY Projects for a Top Loader Laundry Room (Beginner Friendly)
You do not need to be a carpenter. If you can use a drill and a level, you can handle all three. Adjust the steps to your own walls and washer.
Project 1: Fold-down wall shelf (about an afternoon)
You will need: a sturdy board for the top, a wood cleat or mounting rail, heavy-duty hinges, a folding support bracket or leg, screws, wall anchors, a level and a drill.
- Pick the side wall, not the wall above the washer.
- Choose a comfortable height. Stand there and imagine folding a towel.
- Find the studs and mark them. Screwing into studs holds far more weight than anchors alone.
- Mount the cleat or rail and check it with the level.
- Attach the hinges to the board and the rail.
- Add the support bracket or swing-out leg.
- Test it with a full laundry basket before laundry day.
- Check the lid with the shelf both up and down.
Beginner tip: A fold-down table is stronger when the bracket carries the load, not just the hinges.
Project 2: Slim rolling cart for the gap (about 2 hours)
You will need: boards or a narrow ready-made cart, four casters, screws, a tape measure and a drill.
- Measure the gap at its narrowest point.
- Leave a little breathing room so the cart does not wedge in tight. Machines can vibrate.
- Build a simple box frame with two or three shelves.
- Screw on the casters. Locking casters help on uneven floors.
- Add a small front lip so bottles do not slide off.
- Test the roll a few times before loading it up.
Beginner tip: Put the heaviest bottles on the bottom shelf so the cart does not tip.
Project 3: Shelf that hides the connection box (about 3 hours)
You will need: three boards (two sides and a top), thin trim strips, screws, paint, a level and a drill.
- Measure the box and decide how high the shelf should sit above it.
- Check the lid first. Hold your cardboard lid open and confirm the shelf will not touch it. Keep the shelf shallow.
- Cut and assemble the three-sided frame.
- Add trim along the front edges for a built-in look.
- Paint it to match the wall.
- Attach it with screws, not glue, so you can lift it off to reach valves and outlets.
Beginner tip: Paint the pieces before mounting. It is much neater than painting around a shelf.
Which Small Laundry Room Layout Is Right for Your Space?
Not every idea fits every room. Find your situation below and start with the matching ideas. The numbers refer to the 15 ideas above.
| Your situation | Best ideas to start with | Watch out for |
|---|---|---|
| Laundry closet | 2 (fold-down shelf), 7 (pegboard), 6 (slim cart), 13 (sliding doors) | Ventilation when the doors are closed |
| Hallway or kitchen corner | 1 (side counter), 4 (shelves above the lid line), 13 (doors) | Noise, and a clear path for the lid |
| Laundry and mudroom combo | 8 (lockers), 5 (tall tower), 1 (side counter) | Wet coats and shoes near the machines |
| Renting | 6 (cart), 2 (fold-down table), 9 (hanging rod), 14 (peel-and-stick) | Check your lease before drilling |
| Low ceiling or basement | 1 (side counter), 5 (tall tower), 2 (fold-down shelf) | Lid clearance is the limit, so skip shelves above the washer |
Swipe left or right to view all columns →
Still unsure? Go back to your measurement. If you have plenty of space above the lid line, shelves above the washer (idea 4) are the easiest win. If you do not, move everything to the sides.
Renter-Friendly Ideas (No Drilling Needed)
Renting? You still have good options that leave no holes in the wall:
- Rolling cart between the machines
- Freestanding shelving or a slim tower beside the washer
- Tension rod for hanging clothes
- Over-the-door hooks and organizers
- Peel-and-stick backsplash or removable wallpaper
- Freestanding foldable drying rack
Example setup: Imagine a rented apartment with a laundry closet. A tension rod, a narrow rolling cart and a pop-up drying rack add hanging space, storage and a drying spot, with no drilling and no landlord approval needed.
Budget DIY vs. Custom Cabinets: Which Is Worth It?
Before spending a dollar, ask yourself: am I fixing today’s mess, or building a room I will keep for years?
| Factor | Budget, freestanding or DIY | Custom built-in |
|---|---|---|
| Fit | Standard sizes, so gaps are common | Made to your exact measurements |
| Storage height | Freestanding units often stop well short of the ceiling | Can run closer to the ceiling |
| Strength | Can wobble or tip if not anchored | Secured to the wall |
| Upfront cost | Lower | Higher |
| Best for | Renters, first-time DIYers, testing a layout | Owners staying long term, awkward spaces |
Swipe left or right to view all columns →
Where to find affordable storage: ready-made cabinets and shelving units from home improvement stores (anchored to the wall), wood remnants cut to size, and freestanding towers and carts you can take with you if you move.
My honest take: start with budget pieces if you are renting or still figuring out how you do laundry. Move to custom once you know exactly what your room needs and you plan to stay.
Laundry Room Ventilation and Safety Checklist
A pretty laundry closet is only a good one if the air can move and the water stays where it belongs. Go through this list before you close the doors.
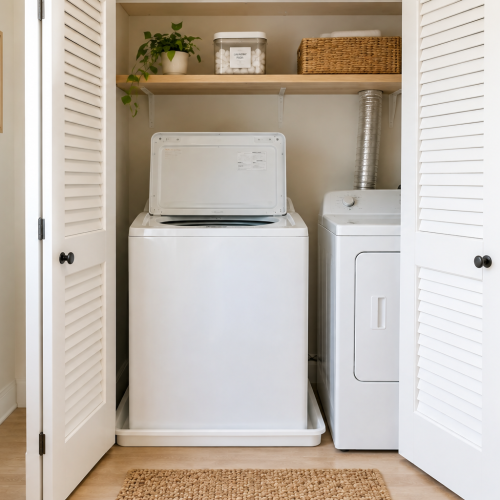
- Add vent openings to a closet door. Closed doors need air openings at the top and bottom. A louvered door is the easy way. Check your model’s installation guide for the exact size.
- Keep the dryer vent short, clear and cleanable. In a tight closet, venting can be tricky, so plan the route early.
- Leave room behind the washer for hoses. Check your manual for your model.
- Consider a drain pan under the washer, especially on upper floors or anywhere a leak could damage the room below.
- Know where your water shutoff is, and do not build a shelf that blocks it.
- Level the washer. An unlevel machine shakes and walks. Anti-vibration pads can help, and avoid soft or bouncy floors.
- Leave the washer lid open between loads so the drum can dry out and help prevent musty smells.
- Keep detergent pods out of children’s reach. Store them high or locked.
- Follow your manual and local rules. For gas dryers, electrical work or venting changes, use a licensed professional.
Common Mistakes to Avoid
- Installing shelves too low. They will hit the lid and become a daily annoyance.
- Resting a counter directly on the machines. It can block the lid and add weight where it does not belong.
- Choosing carpet or absorbent flooring. Moisture and carpet do not mix.
- Ignoring ventilation. Damp air leads to musty smells and mold.
- Boxing in the shutoff valves. You will regret it the first time something leaks.
- Skipping measurements. Always measure your actual machine first.
Frequently Asked Questions
Can you put a countertop over a top load washer?
Usually not a fixed one. A top loader needs open space above the lid. A side counter, rolling cart or fold-down shelf gives you folding space without blocking it.
How much clearance does a top load washer need above it?
It depends on the model, and guides range from about 18 to 36 inches, with some manufacturers recommending at least 2 feet. The safest method is to open your own lid, measure it, add 2 inches, and check your manual.
Can you stack a dryer on a top loading washer?
Not on a regular top loader, because the dryer would block the lid. Stacking is designed for front loaders. A factory-made laundry tower with a top-load washer is the exception.
Can you put a shelf above a top load washer?
Yes, as long as the bottom of the shelf starts above your open-lid height plus a couple of inches. Shelves about 12 inches deep work well.
Can a top load washer fit in a closet?
Yes, if the lid has room to open and the closet gets enough air. Sliding or pocket doors are popular because they do not swing into your working space.
Quick Recap: Your Top Loader Laundry Room Checklist
A top loading washer does not have to limit your laundry room. It just asks you to plan around the lid.
- Measure your open lid from the top of the case, then add about 2 inches
- Keep everything above that line, or move it to the sides
- Use the gaps: a slim cart or pull-out between machines
- Add a fold-down shelf or side counter for folding
- Choose closed storage and good ventilation for a tidy, safe space