Let’s be honest: the cabinet under the kitchen sink is where good intentions go to hide. Half-empty spray bottles, a tangle of plastic bags, three bottles of dish soap you forgot you owned… and a maze of pipes that makes normal organizers just not fit.
If that sounds familiar, you’re in the right place. This guide shares under kitchen sink organization ideas that actually work around pipes and a garbage disposal. No fancy tools. No big budget. Just simple steps that even a total beginner can follow in one afternoon.
Table of Contents
Quick Answer: What's the Best Way to Organize Under a Kitchen Sink?
The best way to organize under a kitchen sink is to empty and clean the cabinet, check for leaks, add a waterproof liner, measure around the pipes, then use vertical storage like a two-tier shelf, a tension rod and door baskets. Label everything, and keep harsh chemicals locked away from kids and pets.
How to Organize Under the Kitchen Sink: 5 Steps Before You Buy Anything
It’s tempting to run to the store and grab a cute organizer. Please don’t, not yet.
The most common mistake is buying storage first and measuring second. Do these five steps first, and you’ll spend less and get a much better fit.
Step 1: Empty, declutter and clean the cabinet
Take everything out. Yes, everything. Line it all up on the counter or floor.
Now be honest with yourself:
- Toss anything empty, expired or leaking
- Combine duplicates (it’s common to find three half-used bottles of dish soap)
- Move items that don’t belong under a sink (more on that below)
Then vacuum up crumbs and wipe the cabinet with a damp cloth and a little dish soap.
Step 2: Check for leaks before you organize
This step takes two minutes, and it can save you a lot of money.
Run a dry paper towel along the pipes, joints and the cabinet floor. Look for:
- Damp spots or water stains
- Soft, swollen or warped wood
- A musty smell
- Drips when you run the tap for a minute
Under-sink plumbing is a common source of slow leaks, and catching one early is much cheaper than repairing a ruined cabinet. If you find a drip, fix it (or call a plumber) before adding any storage.
Step 3: Protect the cabinet floor
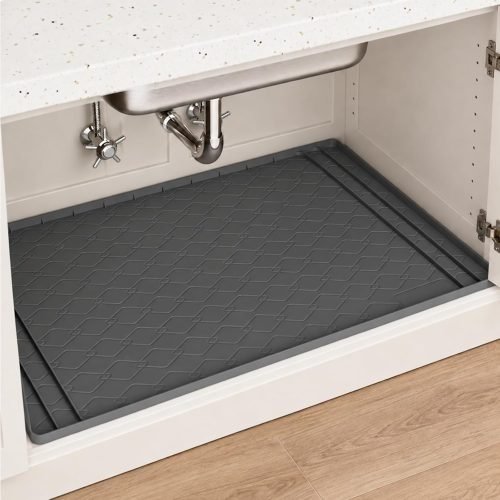
Many cabinet bottoms are made of particleboard, which swells when it gets wet. A waterproof under-sink mat or liner is a cheap way to protect it, and it makes spills easy to wipe up.
Renters: pick a non-adhesive liner that simply lays flat, so there’s nothing to peel off at move-out.
Step 4: Keep the shut-off valves easy to reach
This is the step almost nobody mentions. Look for the water shut-off valves (usually two small taps on the pipes under the sink).
If a pipe ever bursts, you or a plumber will need to reach them fast. So leave a clear path to the valves, and don’t bury them behind boxes or a built-in organizer.
Step 5: Measure and sketch your space
Grab a tape measure and a piece of paper. Write down:
- Width, depth and height of the cabinet
- The height above the drain pipe (how much room you have for shelves)
- The gaps on each side of the pipes and garbage disposal
- The height of your tallest bottle
Then draw a rough sketch of the layout. It doesn’t have to be pretty. Seeing the space on paper makes it much easier to picture where a shelf, rod or basket will actually fit.
Under Sink Safety: How to Childproof the Cabinet and Protect Pets
Here’s something most organizing posts skip: the cabinet under the sink is usually the lowest, easiest door for little hands and curious pets to open.
It’s also where many of us keep the most hazardous products in the kitchen: bleach, drain cleaner, dishwasher detergent and brightly colored pods that can look like candy to a toddler.
Organizing is great. Organizing safely is better. Here’s how:
- Add a child lock or magnetic latch. Many are inexpensive and install in minutes. Pick one that fits your cabinet door style.
- Move harsh chemicals up and away. If you have young children or pets, store bleach, oven cleaner and drain cleaner in a high cabinet or a locked spot (a laundry room shelf works well).
- Keep products in their original containers. Never pour cleaners into water bottles or food containers. The label has the safety information you may need in an emergency.
- Never mix cleaning products. Bleach combined with other cleaners can create dangerous fumes, so keep them well separated.
- Save your local poison helpline number somewhere easy to see, like the inside of a kitchen cupboard door.
If you can’t lock the cabinet, keep only low-risk items inside, such as dishcloths and spare scrubbers, and store everything else higher up.
What to Store Under the Kitchen Sink (and What to Keep Out)
A simple rule makes this easy: if it can’t handle a splash or a damp day, it doesn’t belong under the sink.
That cabinet has pipes, humidity and the occasional slow leak, even in a well-kept home.
Good things to keep under the sink
- Dish soap and dishwasher pods (in an airtight container if kids are around)
- Sponges, brushes and rubber gloves (let them dry first)
- An everyday multi-surface spray you use daily
- Trash bags, stored close to the bin
- A small trash, recycling or compost bin, if there’s room
- A cleaning caddy with your most-used supplies
| Item | Why it doesn't belong under the sink | Better spot |
|---|---|---|
| Paper towels, cardboard, receipts and documents | Moisture swells and ruins paper, and can cause mold | Pantry or a nearby drawer |
| Small appliances and electronics (blenders, hair dryers, toasters) | Water and poor ventilation can damage them | A dry cabinet or the countertop |
| Flammables, paint and solvents | Fire risk, and they shouldn't be in the kitchen at all | Garage or outdoor storage |
| Pesticides and rodent poison | Dangerous to children, pets and food | A high, locked spot outside the kitchen |
| Pet food | Humidity can cause mold unless it's in a tightly sealed container | Pantry or a sealed bin elsewhere |
| Metal tools | The damp air under a sink can cause rust | Toolbox or garage |
| Damp sponges and dish towels | Bacteria thrive in warm, wet conditions | A dry, ventilated place |
| Harsh chemicals (if you have kids or pets) | Safety risk | A high, locked shelf or suitable utility storage area |
Swipe left or right to view all columns →
A quick note: Experts don’t agree on every item. Some say an everyday cleaner is fine under the sink as long as the cabinet stays dry and has a child lock, while others prefer moving all chemicals out. If you have kids or pets, take the safer route and move the harsh products up and out of reach.
Which Under Sink Organizer Fits Your Cabinet? Match Your Setup
No two sink cabinets are the same. A tiny single-door cabinet needs very different help than a deep double-door one with a garbage disposal.
Use this quick chart to find your setup. The numbers point to the ideas in the next section.
| Your setup | What makes it tricky | Ideas that work best |
|---|---|---|
| Small, single-door cabinet | Very little floor space | Tension rod (#6), adhesive hooks (#7), cleaning caddy (#11) |
| Double-door cabinet | A wide space with a gap in the middle | Two-tier shelf (#1), sliding baskets (#2) |
| With a garbage disposal | The bulky unit takes over the middle | Lazy Susan (#4), pipe-friendly shelves (#5), clip-on door baskets (#8) |
| Farmhouse or deep-bowl sink | The bowl cuts into the top of the cabinet | Clip-on door baskets (#8), door trays (#9), stackable bins (#3) |
| Deep cabinet | Things get lost at the back | Sliding baskets (#2), stackable bins (#3), Lazy Susan (#4) |
| Dishwasher hoses or a water filter | Extra hoses and pipes cross the space | Pipe-friendly shelves (#5), hooks (#7), tension rod (#6) |
Swipe left or right to view all columns →
Example: Imagine a small apartment cabinet with one door and a drain pipe in the middle. A big shelf unit won’t fit, but a tension rod for spray bottles and a caddy for daily cleaners will, and neither needs any drilling.
15 Under Kitchen Sink Organization Ideas That Actually Work
Here are the ideas, grouped by what they do. For each one, you’ll see what it is, who it’s best for, and a rough cost range,
Ideas 1-5: Add More Storage Space Under the Sink
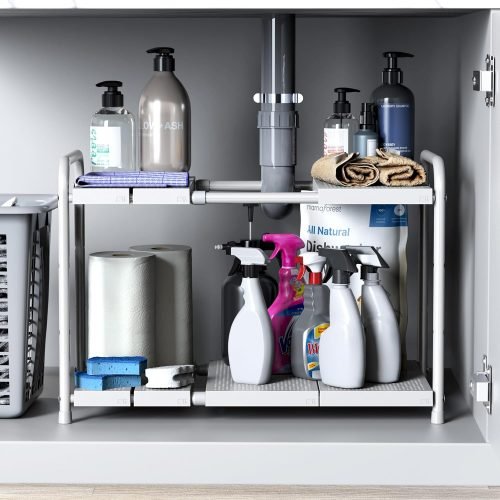
1. Two-tier expandable shelf
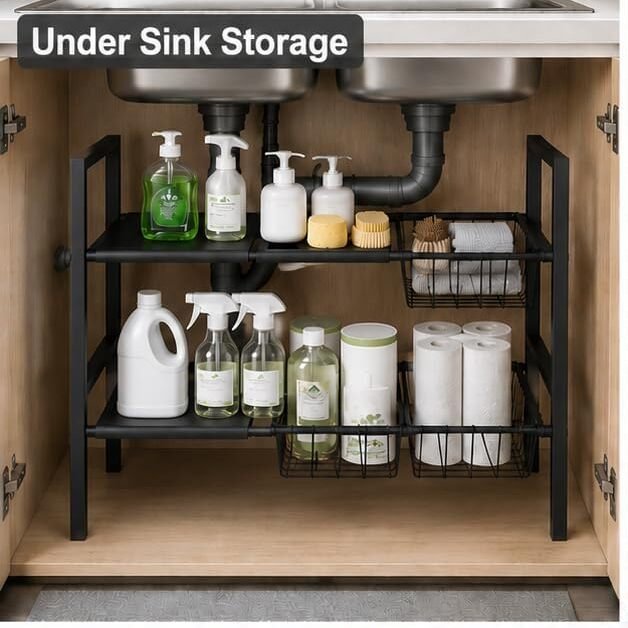
A shelf with two levels doubles your usable space without taking up more floor. Many are expandable and can be adjusted to fit around pipes.
- Best for: double-door cabinets with a flat floor
- Cost: low to mid
- Tip: Measure the height of your tallest bottle first, so it fits on the lower level.
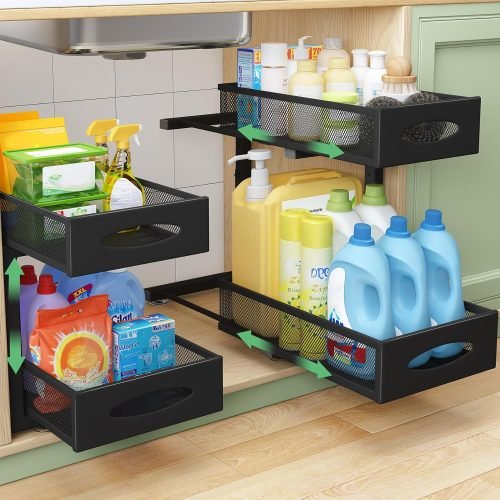
2. Sliding baskets or pull-out drawers
No more digging at the back. Pull-out baskets slide forward so you can see everything at once.
- Best for: deep cabinets, and anyone who hates bending and reaching
- Cost: low to mid
- Tip: Put daily items (sponges, trash bags, dish pods) in the front drawer, and backup supplies in the lower one.
3. Stackable clear bins
The space under a sink is dark. Clear bins let you see what’s inside without taking everything out, and they stack to use the height.
- Best for: small items like dishwasher pods, scrubbers and extra sponges
- Cost: low
- Tip: Wash them in the sink when they get dirty. Clear plastic is easy to clean.
4. Lazy Susan
A turntable might sound odd for a cabinet, but it works well. One quick spin and the bottle at the back is right in front of you.
- Best for: cabinets with a garbage disposal, or deep cabinets
- Cost: low to mid
- Tip: Put bigger items at the back and smaller ones at the front, so you don’t need to spin for everyday items.
5. Shelves made to fit around pipes
Some organizers are built with a cut-out or adjustable panels that straddle the drain pipe. They turn dead space on both sides of the pipe into real storage.
- Best for: cabinets with a drain pipe or disposal in the middle
- Cost: mid
- Tip: Check that the shelf height clears the pipe and any shut-off valves.
Ideas 6-10: Use the Empty Height and the Back of the Cabinet Door
Look at your open cabinet. Do you see all that empty air above your bottles? And the blank back of the door? That’s free storage waiting for you.
6. Tension rod for spray bottles
Place a tension rod (the kind used for curtains) across the cabinet and hang spray bottles by their triggers. This clears the floor and makes bottles easy to grab.
- Best for: small cabinets and renters, since no drilling is needed
- Cost: low
- Tip: Make sure the rod can hold the weight of full bottles, and that your cabinet sides are sturdy enough to grip. Also check that your bottle triggers actually fit over the rod before you buy.
7. Adhesive hooks
Stick a few removable hooks on the cabinet door or side wall to hang rubber gloves, a dish brush or a microfiber cloth so it can air-dry.
- Best for: renters and anyone who changes their mind often
- Cost: low
- Tip: Dampness can weaken adhesive over time, so use hooks for light items only, and check them now and then.
8. Over-the-door or clip-on baskets
The back of the cabinet door is usually wasted space. A basket that hangs over the door (or clips onto it) can hold sponges, trash bags or small bottles.
- Best for: cabinets with a garbage disposal, or anywhere floor space is tight
- Cost: low
- Tip: Make sure the door still closes! Some baskets take up several inches of depth, which can block a shelf or drawer inside. Pick baskets that hang low if you want to store tall bottles.
9. Door-mounted trays
A small tray on the inside of the door is a neat home for spare scrubbers, a sink stopper or a dish brush you’ve already dried.
- Best for: keeping small tools off the counter
- Cost: low
- Tip: Rinse, squeeze and dry sponges on the counter first. Damp ones shouldn’t be stored in a closed cabinet.
10. Battery LED strip light
The cabinet is dark, which is half the reason things get lost in there. A peel-and-stick LED light (many have motion sensors) makes everything visible the moment you open the door.
- Best for: dark, deep cabinets
- Cost: low
- Tip: Choose a battery-powered one and keep it away from direct water and the pipes.
Ideas 11-15: Keep Things Tidy for the Long Run
Organizing once is easy. Staying organized is the real challenge. These five ideas make it simple to keep the cabinet tidy without much effort.
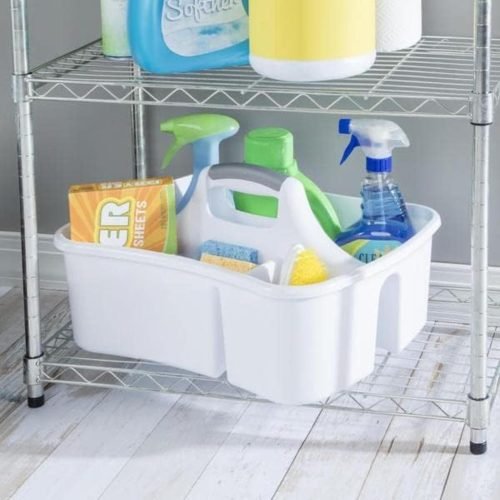
11. Portable cleaning caddy
Keep your most-used cleaning supplies together in a caddy with a handle. When it’s time to clean the bathroom, you grab the whole caddy and go. No more walking back and forth for a bottle.
- Best for: anyone who cleans several rooms in one go
- Cost: low
- Tip: A caddy also lets you pull supplies out in one move when you need to wipe the cabinet floor.
12. Airtight containers for pods and powders
Bulky boxes waste space and can get damp. Move dishwasher tablets and powders into airtight containers. They stack neatly, stay dry and show you at a glance when you’re running low.
- Best for: small spaces and tidy-minded households
- Cost: low to mid
- Tip: If you have young children, pick lids that are hard to open and keep the container up high.
13. Labels on everything
This one is a game changer. When every bin and bottle has a label, everyone in the house knows where things go, and they actually put them back.
- Best for: families and shared homes
- Cost: very low
- Tip: Always label refilled spray bottles so nobody mistakes one cleaner for another.
14. Pull-out trash, recycling or compost bin
If your bin lives under the sink, mount it on a sliding base so it comes out to you instead of you reaching in. It’s cleaner, and it makes taking out the trash far less annoying.
- Best for: kitchens where the bin is under the sink
- Cost: mid to high
- Tip: Keep spare trash bags close by, so changing the bin takes seconds.
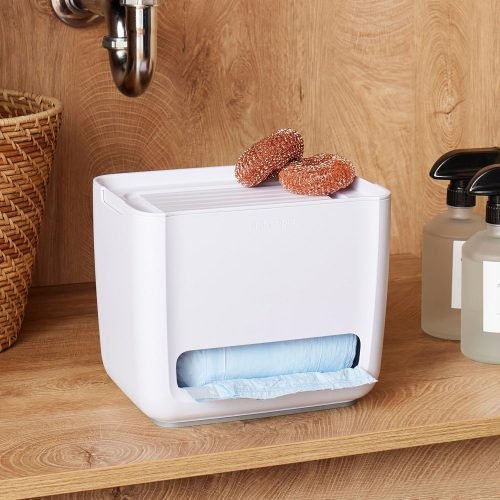
15. Bag holder or dispenser
A pile of plastic or reusable bags can spill out every time you open the door. A simple bag holder keeps them neat. A budget option is to reuse an old wipes container or a tissue box with the top cut off.
- Best for: households that reuse bags as bin liners
- Cost: very low to low
- Tip: Mount it inside the cabinet door to save floor space.
Under Sink Storage for Renters: No-Drill Ideas That Protect Your Deposit
Renting doesn’t mean living with a messy cabinet. You can build a great setup with zero screws and zero damage.
Here are the no-drill methods that work, and what to watch for with each one:
| No-drill method | Works best for | Watch out for |
|---|---|---|
| Tension rod | Hanging spray bottles | Needs sturdy cabinet sides and a rod strong enough for full bottles |
| Freestanding shelf or sliding baskets | Adding layers and easy access | Measure around pipes before buying |
| Clip-on or over-the-door baskets | Using the back of the door | Make sure the door still closes |
| Adhesive hooks and strips | Light items like gloves and brushes | Moisture can weaken adhesive, so keep loads light |
| Non-adhesive waterproof liner | Protecting the cabinet floor | Nothing to peel off later, just lay it flat |
Swipe left or right to view all columns →
Your move-out checklist:
When it’s time to leave, a few small steps help you get your full deposit back:
- Take everything out and remove the liner
- Peel adhesive strips off slowly, following the product’s instructions
- Wipe the cabinet inside and out
- Take a quick photo of the clean, empty cabinet as a record
Easy-Reach Under Sink Storage for Sore Knees, Joints and Busy Hands
Most organizing advice assumes you can kneel down and dig around at the back of a cabinet. Many people can’t, or just don’t want to.
If bending is hard for you, or you’re often holding a child in one arm, design the cabinet so everything comes to you:
- Put daily items at the very front. Dish soap, sponges and trash bags go where you can reach them standing up.
- Use slide-out baskets and drawers so nothing needs to be pulled out from the back.
- Place a Lazy Susan at the front for bottles you reach for most.
- Decant big refills into smaller bottles so nothing is heavy to lift.
- Keep backstock somewhere else, such as a high shelf or the laundry room, and only top up when needed.
- Add a battery LED light so you can see without leaning in.
- Try a long-handled reacher for the rare item at the back.
Example: A parent holding a toddler needs the dish soap now, with one free hand. A pull-out basket lets them grab it in one move, with no kneeling.
Under Kitchen Sink Organization on a Budget: What to Buy at Each Price Level
Good news: you don’t need to spend much. Many of the biggest improvements, like a liner, a rod and a few bins, cost very little.
Prices vary a lot by country and store, so the ranges below (in US dollars) are just a rough guide.
| Budget level | Roughly | What to buy | What it fixes |
|---|---|---|---|
| Free | $0 | Baskets, jars, plastic tubs and old containers you already own | Loose clutter and spilled bottles |
| Starter | Under $20 | Waterproof liner, tension rod, adhesive hooks, labels | Leaks, wasted height, lost items |
| Smart upgrade | About $20–60 | Two-tier shelf or sliding baskets, stackable clear bins, caddy, clip-on door basket, LED light | Hidden items and wasted floor space |
| Splurge | $60 and up | Pull-out trash or recycling system, drawer inserts, professional install | Heavy daily use and a built-in look |
Swipe left or right to view all columns →
Example starter kit: A liner, one tension rod, a handful of hooks and two clear bins can transform a small cabinet for a modest total. Start there, then add a shelf only if you still need more room.
The cheapest trick of all? Own less. Every duplicate bottle you toss is space you don’t have to buy.
How to Keep Your Under Sink Cabinet Organized (A Simple Routine)
Here’s the truth: even the best setup falls apart without a tiny bit of upkeep. The good news is that it takes less than five minutes a week.
The 5-minute weekly reset
- Put stray items back where they belong
- Toss empty bottles and old sponges
- Check that bottle caps are on tight
- Wipe the liner or shelf with a damp cloth
The monthly check
- Run a dry paper towel along the pipes and cabinet floor to check for leaks
- Wipe the whole cabinet and let it air out with the door open for a while
- Check that hooks and adhesive strips are still holding
- Restock only what you actually need
The "one in, one out" rule
When you bring home a new bottle of cleaner, finish or toss the old one. This one habit stops clutter before it builds up.
Keep smells away
Most cabinet odors come from damp items, small spills or a hidden leak. Wipe spills right away, keep trash bags sealed and don’t store wet sponges or towels inside. If a musty smell keeps coming back even after cleaning, have a plumber check for a slow leak.
Example: Pick a regular moment, such as Sunday evening while the kettle boils. By the time your tea is ready, the cabinet is reset.
How to Organize Pots and Pans in a Cabinet: The 5-Step Method
What should I put under my kitchen sink?
Keep things you use at the sink and that can handle a bit of dampness: dish soap, dishwasher pods, dry sponges, gloves, trash bags and an everyday cleaner. If you have kids or pets, keep harsh chemicals somewhere higher or locked.
What should you never store under the kitchen sink?
Avoid paper goods and documents, small appliances, flammables and paint, pesticides, metal tools and pet food (unless it’s in a tightly sealed container). Moisture, leaks and poor ventilation can ruin them or make them unsafe.
How do I organize under a kitchen sink with a garbage disposal?
Measure the gaps on each side of the disposal first. Then use a Lazy Susan, shelves made to fit around pipes and clip-on door baskets. A tension rod in front of the disposal is a handy spot for spray bottles. Keep the disposal easy to reach in case it needs attention.
How do I organize under the sink without buying anything new?
Empty the cabinet, toss duplicates and group like items together. Then reuse baskets, jars, plastic tubs and old containers you already own. A little planning often does more than new products.
How can I add a shelf under the sink around the pipes?
Choose a shelf built to straddle pipes, with adjustable or expandable panels. Measure the height above the drain pipe and the width on both sides. Don’t block the shut-off valves.
Final Thoughts: A Calmer Cabinet Is Closer Than You Think
Organizing under the kitchen sink can feel like a big job, but it’s really just a few small steps: empty, check for leaks, protect the floor, measure, then choose organizers that fit.
Start with the free and low-cost ideas, keep safety in mind if little ones or pets are around and let your cabinet’s real shape guide what you buy. You don’t need a perfect, picture-ready cabinet. You just need one that works for your home.