Does your pots and pans cabinet sound like a drum solo every time you open it?
You reach for one small saucepan, and suddenly a pot, a frying pan, and two runaway lids come crashing out. It’s frustrating, and it’s incredibly common.
The good news: you don’t need a bigger kitchen or a big budget. You just need a simple plan.
In this guide, you’ll learn how to organize pots and pans in a cabinet with a 5-step method. You’ll also get 10 kitchen cabinet storage ideas with honest pros and cons, plus budget and no-drill options for renters.
Table of Contents
What you'll need before you start
- A tape measure and a notepad
- A non-slip shelf liner
- A box or bag for donations
- A damp cloth and mild cleaner
- Optional: adhesive hooks, a pan rack, or vertical dividers
How to Organize Pots and Pans in a Cabinet: The 5-Step Method
Before you buy a single organizer, do these five steps. They cost almost nothing, and they make every pots and pans storage idea work better.
Step 1: Empty the cabinet and wipe it down
Take everything out. Yes, everything: pots, pans, lids, and baking dishes.
Lay it all on the counter or table so you can see exactly what you own. Most people are surprised by what turns up at the back.
Then wipe the shelves, let them dry, and add a non-slip shelf liner. It stops pots from sliding and protects the shelf from scratches.
Step 2: Declutter your cookware
Now be honest with yourself. For each piece, ask three simple questions:
- Have I used it in the past year?
- Is it damaged, warped, or peeling?
- Do I own a duplicate that works better?
Donate what’s in good shape. Recycle or toss anything damaged, especially nonstick pans with a flaking coating.
Example: If you own four frying pans but only reach for two, keep the two you love and pass the rest on. That one decision can free up a whole shelf.
Step 3: Measure your cabinet and your cookware
This is the step most people skip, and it’s why so many organizers don’t fit. All you need is a tape measure.
- Inside width: measure at the narrowest point. That’s often the door opening or a lip on the cabinet frame, not the back wall.
- Inside depth: measure from the front edge to the back wall, and subtract anything that sticks out, like hinges or pipes.
- Shelf-to-shelf height: this tells you whether a rack or upright lids will fit.
- Door clearance: open the door fully. Make sure a pull-out or door-mounted rack won’t hit the hinge or stop the door closing.
- Your biggest pieces: measure your tallest pot and your longest pan handle.
- Compare: write the numbers down, check them against the organizer’s listed size, and leave about half an inch (1 cm) of spare room.
Example: If your door opening is 14 inches wide but the rack is 14.5 inches wide, it won’t go in, even if the cabinet is wider inside.
Step 4: Group cookware by how often you use it
Sort your pots and pans into three groups:
- Daily: your everyday skillet and saucepan
- Occasional: a large stock pot, roasting pan, or casserole dish
- Rarely used: the pressure cooker you pull out twice a year
Daily pieces go at the front, at an easy-to-reach height. Occasional pieces go toward the back or on a lower shelf. Rarely used pieces can live in a pantry or another cabinet.
Think of it like a closet: your favorite jeans shouldn’t be buried under the winter coats.
Step 5: Choose one system and put everything back
Pick one organizer that fits your measurements and your cabinet type (the next sections help you choose).
Then use this simple layout:
- Daily pieces: front of the cabinet
- Occasional pieces: toward the back
- Heaviest pieces: lowest shelf
- Lids: flipped upside down on their pots, or in a lid holder
Nest smaller pots inside larger ones and stack same-size pans together.
Weight and Safety Tips for Heavy Cookware
Cast iron and Dutch ovens are much heavier than most pans. A full stack of pots adds up quickly, so check weight ratings before you load any rack or shelf.
Here’s how to stay safe:
- Weigh your heaviest stack. Put your pots with lids on a bathroom scale before you shop, then compare the number to the organizer’s stated limit.
- Heavy pieces go low. Cast iron, Dutch ovens, and stock pots belong on the lowest shelf or the sturdiest rack.
- Check the shelf too. If a cabinet shelf bows under the load, move the heaviest pieces to the cabinet floor.
- Don’t overload adhesive hooks. Hang only light pans from them.
- Avoid tall, wobbly stacks. They can tip when you pull a pot from the middle.
- Think about your back. Keep heavy pots at a comfortable height. A pull-out shelf makes lifting easier if bending is hard for you.
Which Pots and Pans Storage System Fits Your Cabinet?
There’s no single best solution. The right choice depends on your cabinet type and how many pieces you own. Find your situation below.
| Your cabinet | Best-fit ideas | Watch out for |
|---|---|---|
| Deep base cabinet | Pull-out shelves, adjustable pan rack | Needs room to pull out fully; check door clearance |
| Base cabinet with one tall shelf | Shelf risers, vertical rack | Heavy pieces still go lowest |
| Corner cabinet | Blind corner organizer, lazy Susan | Measure the door opening and test your pan handles |
| Narrow or shallow cabinet | Vertical dividers, tension rods, door lid rack | Fewer pieces fit; move occasional cookware elsewhere |
| Upper cabinet | Lightest pans, door lid rack | Keep heavy pieces out of overhead storage |
| Shelves only, no drawers | Adjustable rack or vertical divider, with a pull-out as a later upgrade | Check shelf strength |
Swipe left or right to view all columns →
By collection size:
- Small collection: use front and back rows, flip lids on pots, and add a liner. You don’t need fancy equipment.
- Medium collection: add an adjustable rack or vertical dividers, plus a lid organizer.
- Large collection: use pull-out shelves, and store rarely used pieces in a second spot, like a pantry shelf or nearby drawer.
Example: A couple in a small apartment might keep their few everyday pieces in the front and one roasting pan at the back. A big family that cooks daily will get more from pull-out shelves and a lid rack.
10 Kitchen Cabinet Storage Ideas for Pots and Pans (With Pros and Cons)
You don’t need all ten. Pick one or two that suit your cabinet, cookware, and budget. Each idea includes an honest downside, plus a rough cost level so you can plan.
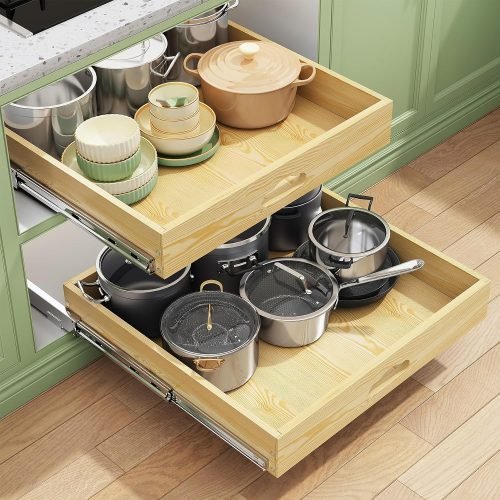
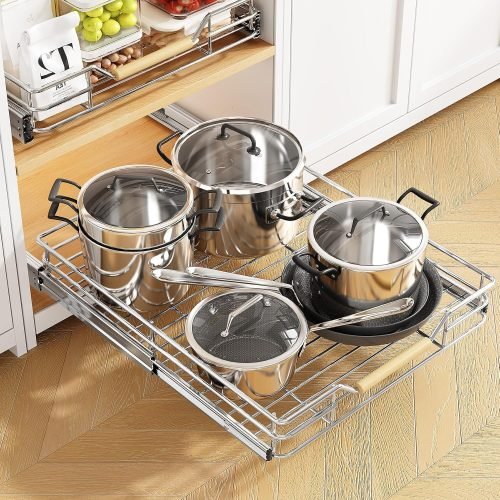
1. Pull-out shelves or sliding racks
These slide your cookware toward you like a drawer, so you never have to dig into the dark back of a deep cabinet.
Example: Instead of lifting three pots to reach the big one at the bottom, you pull the shelf out and grab it.
- Best for: deep lower cabinets and heavy cookware
- The catch: they usually need installing and exact measuring, plus room to pull out fully
- Cost level: mid to premium
2. Shelf risers
A shelf riser sits on an existing shelf and adds a second level, so you can use the empty space above short items.
- Best for: cabinets with one tall shelf and wasted height
- The catch: limited weight capacity, and smaller pots can still slide, so add a liner
- Cost level: low
- Renter-friendly: yes
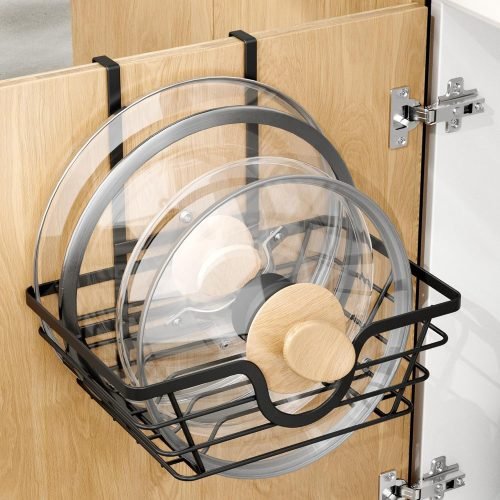
3. Door-mounted lid rack
The inside of the cabinet door is free storage space. A lid organizer there keeps lids upright and easy to match with their pots.
- Best for: the lids you use every day
- The catch: it needs door clearance, and screw-in versions mean drilling into the door
- Cost level: low to mid
- Renter-friendly: yes, if you choose one that hangs over the top of the door
4. Tension rods
This is the cheap DIY trick. A spring-loaded rod fits snugly between two shelves, and pans or lids stand upright beside it. You don’t need any tools.
- Best for: separating pans and lids on a small budget
- The catch: it needs a snug fit between shelves to stay put
- Cost level: low
- Renter-friendly: yes
5. Vertical dividers (file-style storage)
Stand frying pans, baking sheets, and cutting boards on their sides, like files in a folder. Each piece comes out on its own, and the pans don’t touch each other.
- Best for: frying pans, baking sheets, and cutting boards
- The catch: not ideal for tall pots, and it takes some width
- Cost level: low
- Renter-friendly: yes
6. Corner cabinet organizers (blind corner pull-out or lazy Susan)
Corner cabinets are notorious for lost cookware. A lazy Susan spins items into reach, and a blind corner pull-out slides them out.
- Best for: corner cabinets
- The catch: the door opening limits the size that fits, so measure first, and test whether long pan handles catch on the cabinet walls
- Cost level: mid
7. Under-shelf baskets
These hang from the underside of a shelf and use the empty space below it.
- Best for: lids, small pans, or baking trays
- The catch: limited weight capacity
- Cost level: low
- Renter-friendly: yes
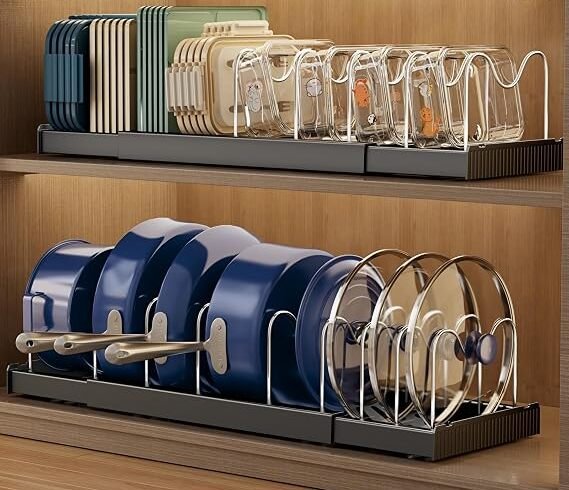
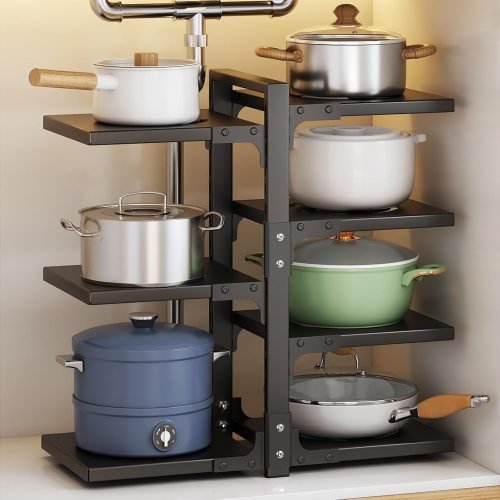
8. Adjustable pot and pan rack
A pan rack has movable dividers that keep pots and pans standing apart instead of piled up. It also works for cutting boards and baking dishes.
- Best for: a mixed collection in one lower cabinet
- The catch: it has a fixed footprint, so check the fit before you buy
- Cost level: mid
- Renter-friendly: yes, it simply stands in the cabinet
9. Adhesive hooks inside the cabinet or door
Stick removable hooks inside the cabinet or on the door and hang lighter pots by their handles. That leaves the shelf free for lids and heavier pieces.
- Best for: small pots and pans
- The catch: hanging limits how many heavy pieces you can store, and heavy cast iron should never hang from adhesive hooks, so check the weight limit
- Cost level: low
- Renter-friendly: yes
10. Non-slip shelf liner
A shelf liner stops pots from sliding and clanging every time you open the door. It also protects the shelf from scratches.
- Best for: reducing noise and sliding
- The catch: it doesn’t add any space
- Cost level: low
- Renter-friendly: yes, and you can take it with you
How to Organize Pot Lids (Without Losing Your Mind)
Lids are the number one reason cabinets turn into chaos. They’re round, they slide, and they never match when you need them.
Try one of these:
- Flip them upside down on their pots. The handle points down and the flat top makes a smooth base for the next pot. This works well for small collections.
- Use a door-mounted lid rack. It keeps lids upright and visible while you cook.
- Stand them upright on a freestanding rack, a vertical divider, or a tension rod, so you can pull one out without moving the rest.
- Use a magnetic strip or towel bar for metal lids, on the cabinet door or a nearby wall.
- Use a magazine file holder if you’re on a tight budget.
Which one should you choose? If you only own a few pots, keep each lid on its pot. If you have lots of lids, use a rack.
How to Store Nonstick, Cast Iron, and Stainless Steel Cookware
Not all cookware should be stored the same way. Different materials have different needs.
| Cookware | Storage tip | Why |
|---|---|---|
| Nonstick | Keep it apart from harder pans, or put a felt protector or soft cloth between pieces | Stacking can scratch the coating |
| Cast iron and carbon steel | Store it dry on a low, sturdy shelf, with a paper towel or pad between stacked pans, away from damp spots like under the sink | Protects the seasoning and helps prevent rust |
| Enameled cast iron | Avoid stacking and give it its own spot | Enamel can chip or crack |
| Stainless steel | Use dividers, or stack with a thin cloth between pans | Tougher than nonstick, but it can still scratch or dent |
| Glass lids | Keep them in a rack and don't put heavy items on top | They're breakable |
Swipe left or right to view all columns →
Example: Putting a nonstick pan directly on top of a stainless steel one is a common way to get scratches. A thin cloth between them fixes it.
Budget and Renter-Friendly Ways to Organize Pots and Pans
You don’t have to spend much to see a big improvement. Start free, and only move up if you still need more.
| Tier | What to do or buy | Best for | Renter-friendly |
|---|---|---|---|
| Free | Declutter, group by type, nest pots, flip lids on pots, use front and back rows | Everyone, as a first step | Yes |
| Low | Shelf liner, adhesive hooks, vertical dividers, tension rods, shelf risers | Small cabinets and renters | Yes |
| Mid | Adjustable pan rack, door lid rack, corner turntable | Most lower cabinets | Mostly yes |
| Premium | Pull-out shelves, corner pull-out unit, custom organizer | Deep or corner cabinets in a home you plan to keep | Depends on mounting |
Swipe left or right to view all columns →
Example: If your cabinet is just crowded, the free tier can fix most of it. If the real problem is a deep cabinet you can’t reach, that’s when a pull-out shelf is worth the money.
If you want a simple starting plan, begin with a liner plus one rack or divider.
Renter-friendly pots and pans storage (no drilling)
Renting? You can still organize without damaging your cabinets.
- Over-the-door lid organizers that hang from the top of the door
- Removable adhesive hooks for lightweight items
- Freestanding racks and shelf risers that need no installation
- Tension rods that need no tools
- Non-slip liners that come with you when you move
Before you stick anything on, check the weight limit and your rental rules, and avoid anything that could peel paint off the cabinet.
What to look for when you buy an organizer
- Adjustable dividers, so it fits pots of different sizes
- A stated weight rating, so you know it can handle cast iron
- Dimensions that match your measurements, with a little spare room
- A non-slip base, so nothing shifts when you pull a pan out
- Easy removal, if you rent
Want to Build Your Own Pull-Out Drawer? (DIY Overview)
If you’re comfortable with basic tools, a custom DIY pull-out drawer is one of the best upgrades for a deep cabinet.
Here’s the short version:
- Measure the cabinet opening and subtract the clearance your drawer slides need.
- Cut plywood for the bottom, sides, back, and front.
- Assemble the box with wood glue and screws.
- Attach full-extension slides to the box and the cabinet. If your cabinet has a face frame, you may need small spacer boards so the drawer clears it.
- Test, adjust, and add dividers.
Safety note: Choose slides rated for the weight of your heaviest cookware. Cast iron adds up fast.
Common Pots and Pans Storage Mistakes to Avoid
Even with a great organizer, a few habits can undo your hard work.
- Buying an organizer before measuring. It’s the most avoidable mistake of all.
- Overcrowding the cabinet. Pans packed too tightly can scratch or warp.
- Stacking metal on metal with nothing between. Add a cloth, felt pad, or paper towel, especially for nonstick.
- Keeping everything. More cookware doesn’t mean a better kitchen.
- Putting daily items at the back. If you use it often, it should be easy to reach.
- Putting heavy pots on high or flimsy shelves. Heavy cookware belongs low and on a sturdy surface.
Example: You order a pretty rack online, and then the door hinge blocks it. Three minutes with a tape measure would have caught that.
Keep It Organized: A 5-Minute Weekly Reset
Getting organized is the easy part. Staying organized takes a tiny habit.
Once a week, spend a few minutes to:
- Put stray lids and pans back in their spots
- Move anything that doesn’t belong
- Wipe up crumbs or spills
Every few months, take out anything you no longer use. Small habits beat big cleanups.
Frequently Asked Questions About Organizing Pots and Pans
How do you neatly organize pots and pans?
Empty the cabinet, remove what you don’t use, and group cookware by type and use. Add a rack, dividers, or risers so nothing has to be lifted out, store lids separately, and keep daily pieces at the front.
Where is the best place to store pots and pans?
Close to the stove, so you’re not carrying a hot pan across the kitchen. A lower cabinet or deep drawer near the cooktop is usually the most convenient, and heavy cookware is easier to lift from a low position.
How do you organize pots and pans in a small kitchen or cabinet?
Go vertical. Add shelf risers or dividers, hang lids on the cabinet door, and keep only the cookware you use weekly in the cabinet. Store occasional pieces elsewhere.
How do you organize pots, pans, and lids together?
Store lids separately so stacks stay flat. Use a door rack, adhesive hooks, or a vertical divider. With a small collection, you can flip each lid upside down on its pot instead.
How do you organize a saucepan cupboard?
Group saucepans by size, nest smaller ones inside larger ones, and keep your daily saucepans at the front. Add a rack or pull-out shelf so you can reach the back, and keep lids on the door or in a divider.
Final Thoughts: Your Cabinet, Under Control
Here’s the whole plan in one minute:
- Empty the cabinet and wipe it down
- Declutter what you don’t use
- Measure before you buy
- Group cookware by how often you use it
- Organize with one system that fits your cabinet
Start small. Even flipping your lids and nesting your pots can make tomorrow’s cooking easier.