Be honest: when did you last find something at the back of your pantry that expired long ago?
Here’s a very common scene. You reach for the olive oil, and it’s gone. Somewhere behind three boxes of pasta and a half-empty bag of rice, it’s hiding in the dark.
A week later you buy another bottle. Then you find the first one.
That’s the classic problem with deep pantry shelves. They give you lots of space, but they also make things disappear at the back.
The good news? Deep shelves aren’t the problem. They’re actually great extra storage. You just need the right system.
In this guide, I’ll show you how to organize a pantry with deep shelves in 7 easy steps, even if you’ve never organized anything before.
Let’s fix that pantry.
Table of Contents
Quick Answer: The Best Ways to Organize Deep Pantry Shelves
Short on time? Here’s the cheat sheet.
- Keep daily items at the front or middle, never at the back.
- Use shelf risers so you can see items at the back.
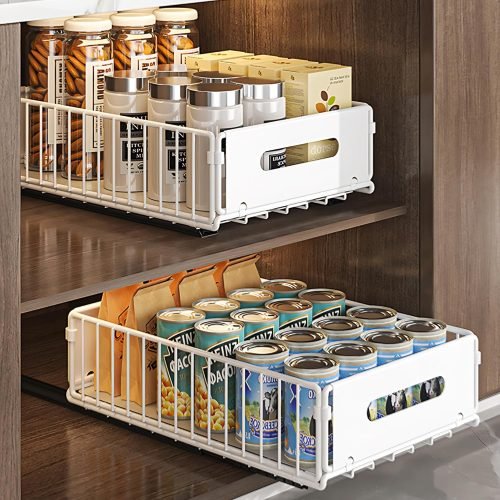
- Add deep bins, drawers or pull-out shelves so you can reach the back easily.
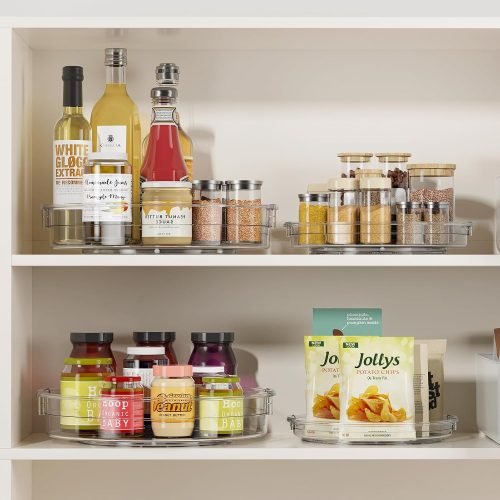
- Fix corners with a lazy Susan for oils, sauces and jars.
- Store backups behind what you’re using and rotate stock with first in, first out.
- Label everything so the whole family puts things back.
That’s the short version. Now let’s do it properly.
How Deep Is Too Deep? Pantry Shelf Depth Size Guide
Deep shelves have one big problem: things get pushed to the back and forgotten.
That leads to:
- Food waste from expired items
- Duplicate purchases because you can’t see what you own
- A messy pantry that feels stressful to open
It’s also tempting to overfill deep shelves just because there’s room. A good system fixes both problems.
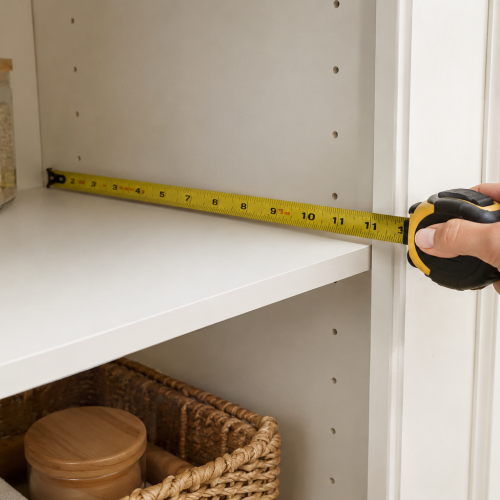
Measure first (it takes two minutes)
Grab a tape measure and write down three numbers:
- Depth: front edge to back wall
- Width: side to side
- Height: the gap between one shelf and the next
This one step saves you money. Nothing is more annoying than buying organizers that don’t fit.
What counts as a "deep" pantry shelf?
There’s no single official number, and advice varies depending on the shelf’s job. Real Homes says pantry shelves are typically 12 to 16 inches deep. Kitchen Cabinet Kings suggests eye-level shelves of about 12 to 14 inches, with deeper 16 to 18 inch shelves lower down for bulky items. And The Shelving Store suggests that in a 20-inch-deep pantry, you may want 18-inch or even 14-inch shelves to leave room at the front.
So keep it simple: if you can’t comfortably see or reach the back, the shelf is deep for you.
Know your pantry type
- Walk-in pantry: you can step inside. Usually the easiest to organize.
- Tall cabinet-style pantry: narrow but very deep, with several shelves. This is where things get lost most often.
- Closet pantry: a repurposed closet, often with fixed shelves.
A cabinet pantry usually needs the most help at the back. A walk-in may only need a few risers and bins.
The 7-Step Deep Pantry Method
Take it one step at a time. You don’t have to finish in a day. Even 10 minutes here and there works.
Step 1: Check Your Limits
You have your measurements. Now ask yourself a few quick questions:
- Do you rent or own? Renters should lean on bins, risers and over-the-door racks that need no drilling.
- What’s your budget? You can start with very little (see the budget section below).
- Who uses the pantry? If kids need snacks, give them a low shelf. If you buy in bulk, plan space for backups. If someone has allergies, keep those foods together and clearly labeled.
Step 2: Empty, clean and purge
Take everything out and put it on the counter. Yes, everything. The best time is when the pantry is full, so you don’t miss anything hiding at the back.
Then:
- Check dates and toss anything expired.
- Donate unopened food you won’t eat.
- Wipe the shelves while they’re empty.
- Move things that don’t belong in the pantry somewhere else.
Step 3: Group similar items together
Sort everything into categories based on how you actually cook and eat:
- Baking (flour, sugar, baking powder)
- Breakfast (cereal, oats)
- Snacks
- Canned goods
- Pasta, rice and grains
- Oils, sauces and spices
- Backstock (extras you bought in bulk)
Example: if you bake on weekends, keep flour, sugar, baking soda and vanilla together. Then you grab one bin and have everything, instead of hunting across three shelves.
Step 4: Create zones by how often you use things
This is the most important step for deep shelves. The golden rule: the harder it is to reach, the less often you should need it.
- Top shelves: rarely used items, party supplies, paper goods
- Middle shelves (eye to waist level): everyday items like snacks, breakfast foods and cooking staples
- Bottom shelves: heavy or bulky items like bottled water and large bags
Then split each deep shelf in two:
- Front: things you use daily
- Back: spares and backups
Never store daily items at the very back. You’ll stop using that space completely.
Step 5: Bring the back forward with risers, bins and a lazy Susan
Now, and only now, go shopping. Here are the three easiest fixes.
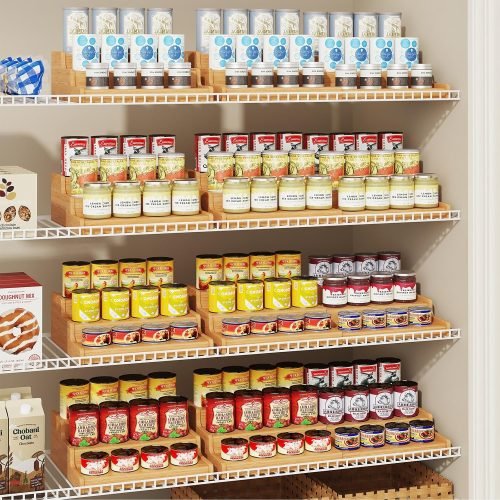
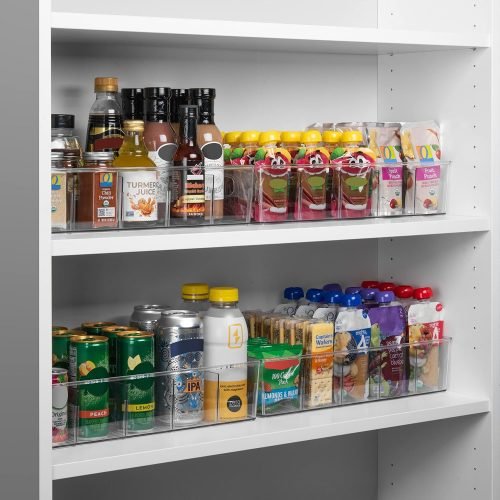
Shelf risers: stadium seating for your pantry. A riser lifts items at the back so you can see them over the items in front. It’s great for canned goods, jars and sauces. Choose an adjustable one that fits your shelf width.
Deep bins: pull-out “drawers.” Put loose items like snack bars, seasoning packets and baking supplies in bins close to the shelf’s full depth. When you need something, pull out the whole bin. Measure first, because a bin that’s too short wastes the depth you’re trying to use.
Lazy Susans: fix hard-to-reach corners. Spin it and everything comes to you. Use one category per turntable, put the most-used items on the outer edge, and choose a non-skid one so bottles don’t slide.
Step 6: Label everything and write a quick inventory
Labels help the whole family put things back in the right place. Label bins, containers and even shelf edges. A label maker or handwritten tags both work.
Then jot down what’s stored at the back and tape the list inside the pantry door. This one habit stops duplicate buying.
Step 7: Use first in, first out (FIFO)
This is how grocery stores keep food fresh, and it works at home too.
When you unpack groceries, put new items behind older ones. You’ll naturally use the old stuff first, and less food goes to waste.
Pull-Out Shelves and Drawers for Deep Pantries: From No-Install to DIY
If you can only do one upgrade, make it this one. The idea is simple: bring the back to you instead of reaching for it.
There are four options, from easiest to most involved:
- Slide-out bins (no installation): large stackable drawer bins that you pull forward like a drawer. Renter-friendly.
- No-drill pull-out organizers: these attach with adhesive instead of screws. Check the weight limit and recent reviews first, because adhesive may not suit very heavy items.
- DIY drawers on tracks: you’ll need a drill and some careful measuring. Best for confident DIYers.
- Custom pull-out shelves: professionally installed and usually the most expensive. Get a quote first.
Ready to try option 3? Here are the general steps. Always follow the instructions that come with your kit.
How to install pull-out drawers in a deep pantry (step by step)
What you’ll need: drawer slides or a pull-out shelf kit, a drill and screwdriver, a tape measure and pencil, and a level.
- Measure the shelf depth, width and opening carefully.
- Choose slides with a weight rating that suits what you’ll store. Check the rating on the package.
- Mark where the slides go and make sure they’re level.
- Attach the slides to the shelf or pantry sides with screws.
- Mount the drawer or bin onto the slides.
- Test with a light load first, then add your items.
Safety tip: if you’re unsure about drilling into your pantry, ask a handy friend or a professional for help.
Best Pantry Organizers for Deep Shelves: Comparison and Budget Guide
Not sure what to buy first? Use this table.
| Organizer | Best for | Works best at depth | Installing needed? | Cost level | Renter-friendly? |
|---|---|---|---|---|---|
| Shelf risers | Cans, jars | 12 to 20 inches | No | Low | Yes |
| Deep bins with handles | Snacks, packets | 16 inches or more | No | Low to medium | Yes |
| Lazy Susan | Corners, oils, sauces | Any | No | Low | Yes |
| Clear stackable containers | Flour, rice, pasta | Any | No | Medium | Yes |
| Over-the-door rack | Spices, small items | Any | Minimal | Low to medium | Usually |
| Pull-out drawers | Heavy or daily items | 20 inches or more | Yes (or DIY) | High | Rarely |
Swipe left or right to view all columns →
What to look for before you buy
- Deep bins: pick bins close to your shelf depth, in a few widths so you can mix and match.
- Shelf risers: choose expandable, multi-tier ones that fit your width and hold standard cans.
- Lazy Susans: look for a non-skid base and a size that fits your shelf without crowding it.
- Clear containers: pick airtight, stackable ones in matching sizes.
- Labels: easy-peel or erasable labels can be updated without sticky residue.
Always measure before you buy. It’s the easiest way to avoid returns.
Pantry organization on a budget
Here are simple budget tiers. Prices change, so check current prices before you buy.
| Budget (suggested bands) | Typical picks | What it solves |
|---|---|---|
| Under $25 | Lazy Susan, shelf risers, a few clear bins | Seeing and reaching the back |
| $25 to $75 | Stackable drawer bins, over-the-door rack, clear containers | Grouping items and using height |
| $75 and up | Pull-out drawers or custom shelves | Full-depth access |
Swipe left or right to view all columns →
Tip for beginners : start with the cheapest tier, live with it for two weeks, then add more only if you need it.
How to Organize Any Deep Pantry: Renters, Narrow, Corner and Walk-In Pantries
Every home is different. Here’s how to adapt the method to your space.
Renters: no-drill pantry organization
You can fix deep shelves without a single screw:
- Shelf risers and handled bins
- Stackable drawer bins that slide out
- Lazy Susans
- Over-the-door racks that hang on top of the door
- Clip-on under-shelf baskets for extra space
- A small rolling cart on the pantry floor
All of these can go with you when you move.
Narrow, deep pantry
Think of it like a long tunnel. Keep it simple:
- Group small items in clear baskets or bins.
- Pull a whole bin out to the counter when you need something.
- Keep the very back for backups and overflow.
Deep corner pantry
Corners are where food goes to disappear. Use lazy Susans and risers, and keep only non-perishables you don’t need daily back there.
Deep walk-in pantry
Walk-ins give you lots of room, but they can turn into a dumping ground.
- Make zones by wall (breakfast on one, baking on another).
- Keep heavy bulk items low.
- Keep a step stool inside for top shelves.
- A rolling cart adds flexible storage.
Tall pantry with deep shelves
Store rarely used items up high and heavier items low. Avoid putting glass jars or heavy appliances on high shelves.
Families with kids and pets
Put snacks in a low basket so kids can help themselves, and keep breakables and treats higher up. Use labels with words and simple pictures so everyone can put things back.
Store pet food low in a sealed container. It’s heavy, and sealing keeps it fresh and tidy.
Accessibility
Keep daily items between waist and eye level, where they’re easiest to reach. One design guide lists roughly 69 to 76 inches as the common maximum shelf reach, so keep anything you use often well below that.
Small kitchens
Use the back of the pantry door and under-shelf baskets first. They add storage without taking up shelf space.
7 Common Deep Pantry Organizing Mistakes to Avoid
Even with great organizers, a few habits can undo your hard work.
- Buying organizers before measuring. A few inches off can make a bin useless.
- Overfilling the shelves. Just because there’s space doesn’t mean you should fill it. Leave room to reach and see.
- Putting daily items at the back. You’ll stop using that space entirely.
- Skipping the declutter. Organizing a messy pantry only makes the mess look neater.
- Mixing too many container styles. Matching containers stack better and look cleaner.
- Skipping labels. Without them, the system falls apart within weeks.
- Forgetting the back of the door. It’s prime storage space for spices, snacks and small packets.
Pantry Safety and Food Storage: Keep Food Fresh and Pest-Free
An organized pantry also protects your food and keeps you safe. This part is often overlooked.
Keep food fresh and pests out
- Use FIFO. Put new items behind older ones so you use the oldest first.
- Store flour, rice, sugar and cereal in airtight containers.
- Keep food off the pantry floor. Professional organizers quoted by Fox News note it can invite mice, ants and moths.
- Keep the pantry clean and dry, and wipe shelves regularly.
- If you spot pests, throw out affected items and clean thoroughly.
- Write the date on opened items, since things at the back are the first to be forgotten.
Weight limits and reaching high shelves
- Put heavy items on lower shelves.
- Keep glass jars away from high shelves.
- Check the weight rating on risers, pull-outs and drawers before loading them.
- Use a sturdy step stool for top shelves, never a chair.
- Don’t overload shelves or drawers beyond their rating.
How to Keep a Deep Pantry Organized: Simple Habits
Getting organized is the easy part. Staying organized is where most people slip.
Keep your habits tiny:
- First in, first out: new stock goes behind the old, every time you unpack groceries.
- Weekly 5-minute reset: straighten bins, push items forward and check what you need.
- Monthly check: toss expired items and wipe spills.
- Before shopping: check your inventory so you don’t buy duplicates.
- One in, one out: buy something new only when you finish or remove something.
- Each season: re-check your zones, for example before holiday baking.
- Leave a little flex space: keep one open spot for odd-shaped or rarely bought items.
People Also Ask: Deep Pantry Organization FAQs
How deep should pantry shelves be?
There’s no single rule. Real Homes says 12 to 16 inches is typical, while Kitchen Cabinet Kings suggests about 12 to 14 inches at eye level and 16 to 18 inches for bulky items lower down. If you can’t comfortably see or reach the back of yours, treat it as deep and use risers, bins or pull-outs.
How deep is too deep for pantry shelves?
Kitchen Cabinet Kings warns that very deep shelves make it easy to lose items at the back. The Shelving Store suggests choosing shelves a few inches shallower than the pantry so the front stays accessible. Judge it by use: if things regularly get lost at the back, it’s time for risers, bins or pull-outs.
What should you put at the back of deep pantry shelves?
Put backups, overflow and rarely used items at the back, like an extra bottle of oil or spare canned goods. Keep everyday foods at the front and at eye level.
How do you stop food getting lost at the back?
Use shelf risers, clear containers and pull-out bins so the back is visible and reachable. Keep a simple inventory on the pantry door so you always know what’s behind the front row.
What do you do with shelves that are too deep?
Add risers, deep bins or pull-out drawers, and split the shelf into front and back zones. If possible, add an extra shelf or a slide-out shelf.
Final Thoughts: Make Your Deep Pantry Work for You
Deep pantry shelves aren’t the problem. Hidden, hard-to-reach shelves are. Once you can see and reach the back, all that extra space finally works for you.
Here’s the quick recap:
- Measure your shelves and know your pantry type.
- Zone your pantry by how often you use things.
- Add shelf risers, deep bins and a lazy Susan.
- Label everything and use first in, first out.
- Upgrade to pull-out drawers when you’re ready.
Start with just one shelf this weekend. Declutter it, measure it, add a riser or a bin, and see the difference. Once you do, you’ll want to keep going.